
Creating a Rainbow Naked Cake is one of the most visually exciting and surprisingly simple ways to impress at any birthday party, baby shower, or celebration. With its vibrant multi-colored layers and signature minimal frosting style, this cake is a perfect mix of modern elegance and playful fun. In this detailed guide, you’ll learn how to bake, layer, and decorate your own Rainbow Naked Cake from scratch even if you’re a beginner.
We’ll walk you through all the essential tools, ingredients, baking techniques, and pro tips to ensure your cake is moist, flavorful, and structurally sound. You’ll also learn about buttercream consistency, vibrant food coloring strategies, and how to avoid common mistakes. Don’t miss our complete naked cake overview to understand why it’s so popular.
Introduction to Rainbow Naked Cake
What is a Rainbow Naked Cake?
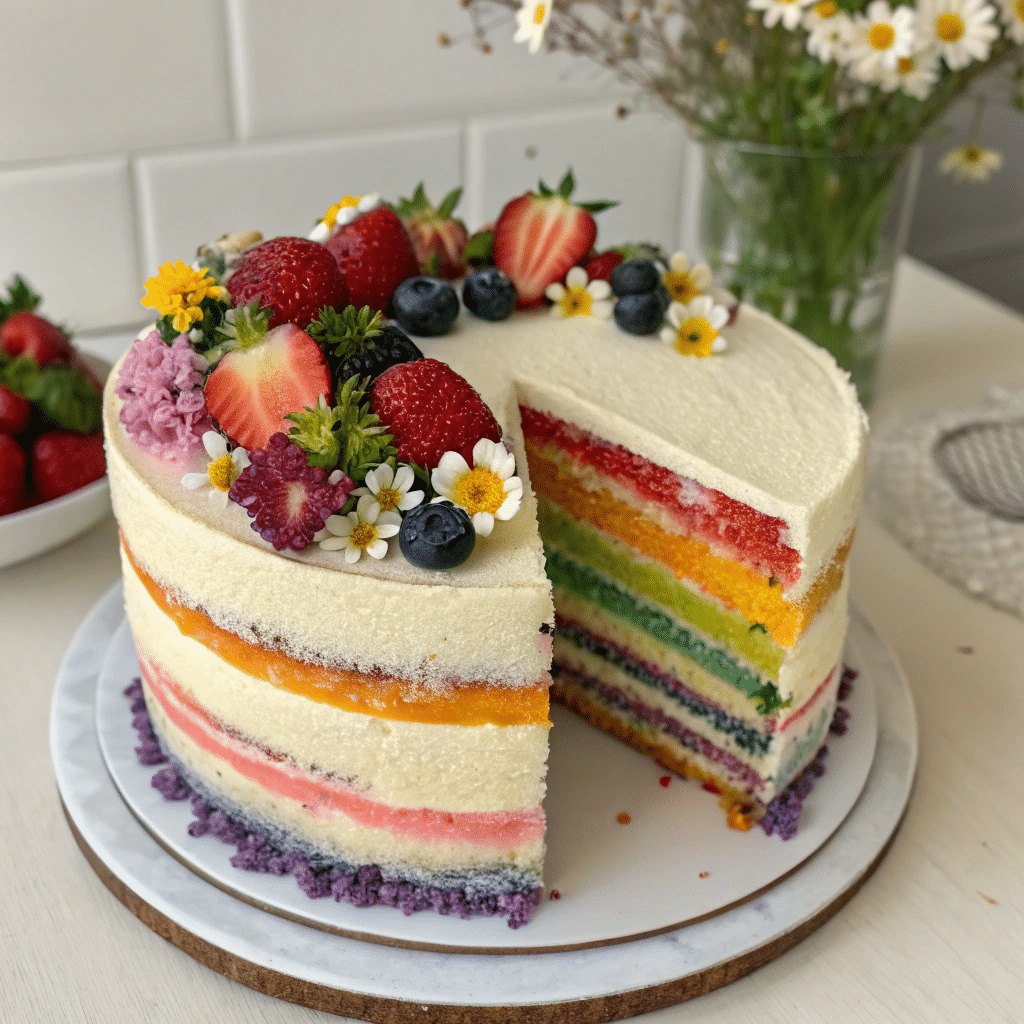
A Rainbow Naked Cake is a multi-layered sponge cake where each tier is dyed a different bold color typically red, orange, yellow, green, blue, and purple. What makes it a “Rainbow naked cake” is the minimalist frosting: the layers are lightly frosted, revealing the bright, beautiful sponge beneath instead of fully covering it.
This trending dessert is ideal for those who love a pop of color but prefer a more rustic, homemade look over heavily frosted cakes. The buttercream is spread thinly around the cake’s edges, creating a semi-exposed look that highlights the vibrant internal structure.
Rainbow naked cakes are especially popular in the U.S. for birthday parties, gender reveals, and kids’ events. With a splash of creativity and simple tools, you can craft a showstopping centerpiece that looks as good as it tastes.
Why Rainbow Naked Cakes Are Trending in the U.S.
From Instagram to Pinterest, Rainbow naked cakes have become a visual staple. In an era where less is more, many home bakers and pros are embracing this stripped-down style for its clean look and shorter prep time.
Here’s why the Rainbow naked cake trend continues to grow in the U.S.:
- Aesthetic Appeal: The layers and textures are fully visible creating instant visual interest.
- Faster to Decorate: No need for fondant or smooth outer coating. It saves time without sacrificing impact.
- Less Sugar: With minimal outer frosting, these cakes are lighter in taste.
- Customizable: From seasonal decorations to rainbow color schemes, Rainbow naked cakes can match any theme.
The Rainbow Naked Cake combines the joy of color with the simplicity of naked layering, making it one of the most loved cakes in modern baking culture.
Essential Tools and Equipment for Rainbow Naked Cake
To create a perfectly layered Rainbow Naked Cake, the right tools are just as important as the ingredients. Precision in baking comes down to consistency, and that’s only achievable when you have the essentials at your fingertips. Whether you’re a beginner or a seasoned baker, these items will make the process smoother and more enjoyable.
Must-Have Baking Tools for Success
Using the correct equipment helps you maintain even layers, achieve vibrant colors, and apply a clean, rustic buttercream finish. Here are the key tools you’ll need for rainbow cake success:
| Tool | Purpose |
|---|---|
| 8-inch round cake pans (x6) | Ensures even size and baking for all rainbow layers |
| Mixing bowls (at least 2 large) | Keeps wet and dry ingredients separate until ready to combine |
| Electric hand mixer or stand mixer | For smooth batter and buttercream without lumps |
| Rubber spatulas | Scrape the sides of bowls clean and fold batter gently |
| Kitchen scale | Helps measure flour and sugar accurately for consistent layers |
| Wire cooling rack | Speeds up cooling time and prevents soggy bottoms |
| Serrated knife or cake leveler | Trims cake tops for flat stacking |
| Offset spatula | Spreads buttercream evenly with control |
If you’re wondering whether you can get by without a mixer technically, yes. But keep in mind: manually mixing six colorful batters can wear you out fast. A stand mixer saves time and wrist strain.
Choosing the Right Cake Pans and Parchment Paper
For even baking, you’ll need six 8-inch cake pans one for each color of the rainbow. If you only have two or three pans, you’ll need to bake in batches, which can extend your prep time but still works.
Here’s why 8-inch pans are ideal:
- Even Thickness: Helps create straight, uniform layers.
- Proper Volume: Allows enough space for the batter to rise without spilling over.
- Stackability: Easier to frost and stack without leaning or cracking.
Pro Tip: Always line the bottoms of your cake pans with parchment paper. Even if your pans are nonstick, parchment guarantees your colorful layers come out clean without breakage or crumbling edges.
Check out how we build the perfect Christmas Naked Cake using these same tools to ensure your cakes release flawlessly every time.
Ingredients Breakdown for Rainbow Naked Cake
The beauty of a Rainbow Naked Cake doesn’t just lie in its colors it’s the taste, texture, and structural integrity that make it a success. Using the right ratio of ingredients ensures your cake is not only vibrant and fun but also moist, tender, and stable enough to stack.
Let’s dive into the essential components for both the colorful cake layers and the creamy buttercream frosting.
Rainbow Layer Ingredients: Color, Structure, and Flavor
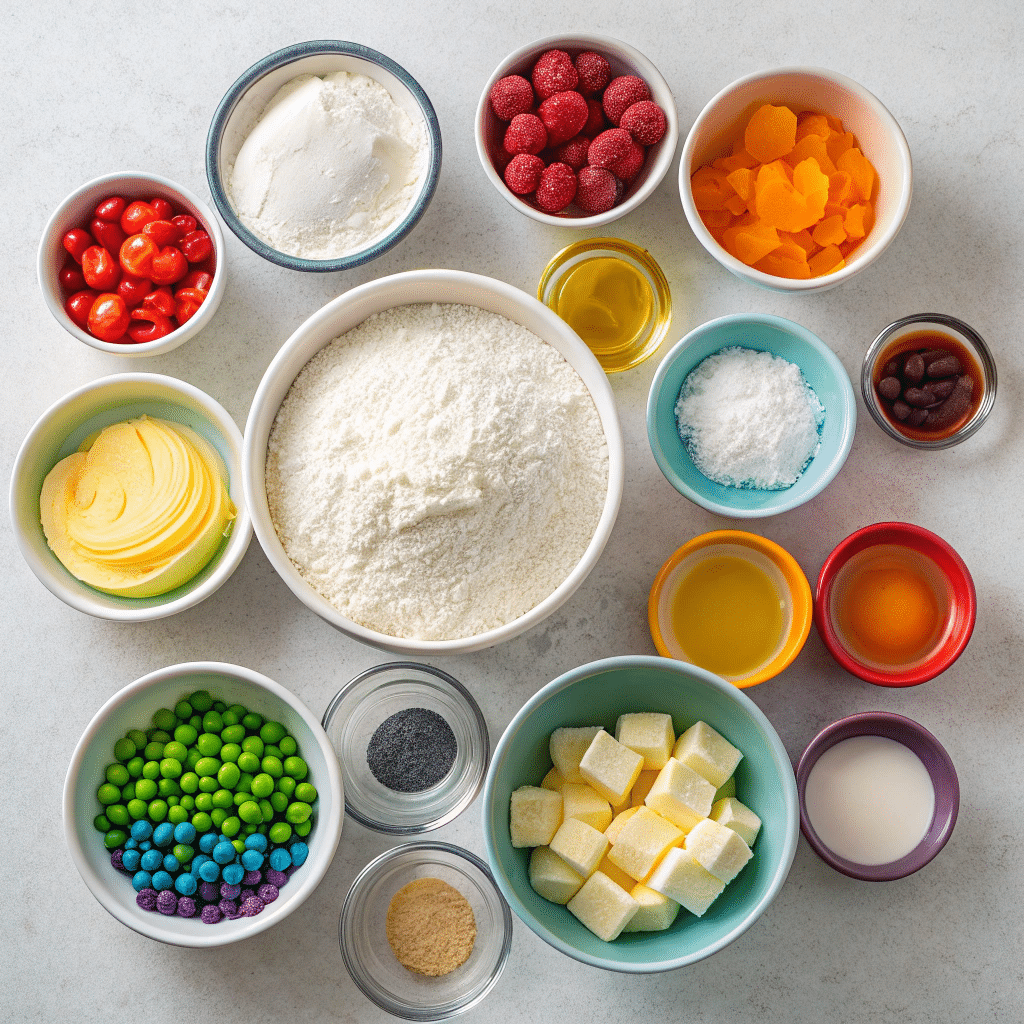
The foundation of a great rainbow cake is a moist vanilla sponge that holds color well without crumbling. Here’s a breakdown of what you’ll need for the layers:
| Ingredient | Amount | Purpose |
|---|---|---|
| All-purpose flour | 5 cups (600g) | Creates a stable structure for stacking layers |
| Granulated sugar | 3 cups (600g) | Adds sweetness and helps layers brown evenly |
| Baking powder | 1 tbsp | Primary leavening agent for fluffiness |
| Baking soda | ½ tsp | Balances the pH when combined with dairy |
| Salt | 1 tsp | Enhances overall flavor |
| Eggs (large) | 6, room temp | Bind ingredients and add richness |
| Vegetable oil | 1½ cups (360ml) | Keeps layers moist and soft |
| Whole milk | 1½ cups (360ml) | Adds moisture and lightens the texture |
| Vanilla extract | 1 tbsp | Provides classic cake flavor |
| Food coloring | Gel-based, 4+ colors | Delivers bold color without thinning the batter |
Why Gel Food Coloring?
Gel food coloring gives you intense hues with just a few drops. Unlike liquid dyes, it won’t mess with your batter’s consistency. For vivid rainbow tones, we recommend red, yellow, blue, and green you can mix to create orange and purple.
Mixing Tip: Divide your batter evenly into six bowls before adding color. Use a digital scale for precision so each layer bakes to the same height.
Perfect Buttercream Frosting for a Rainbow Naked Cake Finish
The frosting for a Rainbow naked cake should be thick, smooth, and spreadable but not so much that it hides the layers. The goal is to gently coat and bind the cake, allowing the rainbow interior to shine through. Here’s what you’ll need:
| Ingredient | Amount | Role |
|---|---|---|
| Unsalted butter | 2½ cups (565g), softened | The base of the buttercream creamy and rich |
| Salt | ½ tsp | Balances the sweetness |
| Confectioners’ sugar | 10 cups (1200g) | Sweetens and gives structure |
| Heavy cream | ½ cup (120ml), room temp | Thins and smooths the texture |
| Vanilla extract | 2 tsp | Enhances the flavor profile |
Pro Tip: Beat the butter alone first until pale and fluffy this creates a smooth base. Then slowly add in sugar and cream for a silky finish.
You’ll use this buttercream between the layers and lightly around the outside to get that clean “naked” look.
For seasonal inspiration, looking for a more rustic aesthetic? Try the Fall Naked Cake version with the same buttercream base but cozy autumnal styling.
Preparing the Batter for Your Rainbow Layers
Now that you’ve gathered your ingredients, it’s time to create the star of the show: the rainbow cake batter. This part can make or break the final look of your Rainbow Naked Cake. Even mixing, vibrant coloring, and smooth consistency are key to achieving perfect, stackable layers that wow guests at first glance.
Print
Rainbow Naked Cake: The Ultimate Step-by-Step Guide to Colorful Layered Bliss
- Total Time: 1 hour 50 minutes
- Yield: 12
Description
This Rainbow naked Cake recipe is moist, tender, and beyond stunning with its six different colored cake layers! The brightly colored cake will be the star of the show!
Ingredients
For the Rainbow Cake Layers:
- 5 cups all-purpose flour (600g)
- 3 cups granulated sugar (600g)
- 1 tablespoon baking powder
- ½ teaspoon baking soda
- 1 teaspoon salt
- 6 large eggs room temperature
- 1½ cups vegetable oil (360ml)
- 1½ cups whole milk (360ml)
- 1 tablespoon vanilla extract
- Food coloring (red, yellow, blue, green)
For the Buttercream:
- 2½ cups unsalted butter softened (565g)
- ½ teaspoon salt
- 10 cups confectioners’ sugar (1200g)
½ cup cream room temperature (120ml)
- 2 teaspoons vanilla extract
Instructions
For the Rainbow Cake Layers:
-
Preheat the oven to 350F. Grease two or three 8-inch round cake pans with baking spray or butter. Line the bottoms with parchment paper.
-
In a large mixing bowl, whisk together the flour, sugar, baking powder, baking soda, and salt.
-
In another large mixing bowl, combine the eggs, vegetable oil, milk, and vanilla. Whisk until well combined. Pour into the flour mixture and whisk until combined.
-
Divide the batter among 6 mixing bowls. Color each batter with food coloring to make red, orange, yellow, green, blue, and purple batters. Pour a single color batter into each cake pan. Place the remaining batter bowls in the fridge until ready to bake. (This helps to stop the baking powder from reacting while waiting to bake.)
-
Bake for 20 minutes or until a toothpick inserted into the center comes out clean. Let the cakes cool for 10 minutes in the pan, then remove and finish cooling on a wire rack. Wash the pans, grease and line with parchment paper again, and bake the remaining batters.
For the Buttercream:
-
In a large mixing bowl or the bowl of a stand mixer fitted with the whisk attachment, beat the butter and salt on medium speed until very fluffy and pale, about 5 minutes.
-
With the mixer on low speed, gradually add the confectioners’ sugar a cup at a time, adding a tablespoon of cream at a time throughout mixing. Stop and scrape down the bowl occasionally during mixing. Once all of the sugar is added, beat in the vanilla and add additional cream if the frosting feels grainy when rubbed between your fingers. Increase the speed to medium-low and beat until light and fluffy, about 1 minute.
For the Assembly:
-
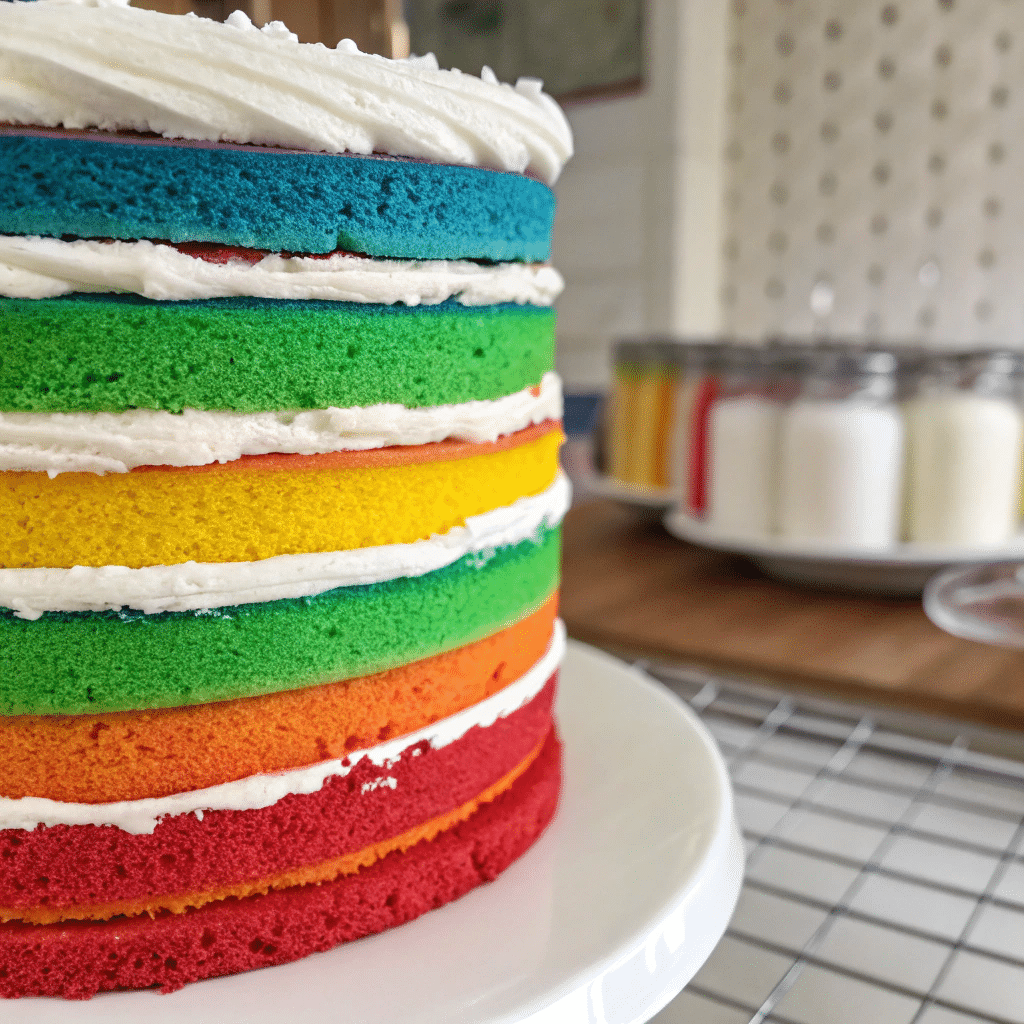
Remove the parchment paper from the cake layers. Place the purple layer on a cake plate and spread ½ cup of frosting over the top. Place the blue layer on top and spread another ½ cup of frosting on top. Repeat with the remaining cake layers in the order of green, yellow, orange, and red. Spread the remaining frosting all over the outside of the cake. Chill the cake for at least 1 hour before serving. Leftover cake should be covered and can be stored at room temperature for up to 3 days.
Notes
- If the tops of your rainbow cake layers are domed, then use a serrated knife to cut off the top of the domes so you can stack them evenly. Alternatively, use cake strips to help your cake layers come out evenly. Cake strips work by keeping the outside edge of the pan cooler to ensure that the entire cake rises at the same rate, preventing a dome from forming in the middle. If you don’t want to buy cake strips, then see my post on how to DIY cake strips.
- I highly recommend using a scale to measure your flour, as it’s the most accurate method. If you don’t have a scale, fluff your flour with a spoon and spoon it into your cups before leveling it off with a knife. Fluffing the flour and spooning it into a measuring cup prevents you from overpacking it.
- Make sure to allow the cake layers to cool before you add the buttercream.
- The longer you chill the rainbow cake, the better the buttercream will stick to the cake layers.
- Make sure the butter is room temperature before you cream it, as cold butter will lead to lumpy buttercream.
- Avoid over-mixing the batter as you risk over-developing the gluten leading to a tough, dry, and dense cake.
- Prep Time: 1 hour
- Cool Time: 10 minutes
- Cook Time: 40 minutes
- Category: Dessert
- Cuisine: American
Nutrition
- Serving Size: 1
- Calories: 1440kcal
- Sugar: 150g
- Sodium: 497mg
- Fat: 73g
- Saturated Fat: 32g
- Unsaturated Fat: 18g
- Trans Fat: 2g
- Carbohydrates: 192g
- Fiber: 1g
- Protein: 10g
- Cholesterol: 198mg
Mixing the Wet and Dry Ingredients Properly
Start by preheating your oven to 350°F (175°C) and preparing six 8-inch pans with parchment paper circles.
Step-by-step mixing instructions:
- In a large bowl, whisk together all-purpose flour, baking powder, baking soda, salt, and sugar. Mixing dry ingredients thoroughly ensures your cake rises evenly.
- In a separate bowl, combine eggs, vegetable oil, whole milk, and vanilla extract. Make sure eggs and milk are at room temperature to prevent curdling.
- Gradually combine the wet ingredients into the dry. Use an electric mixer on medium speed for about 1–2 minutes. The batter should be smooth but not over-mixed, or you’ll lose tenderness.
Pro Tip: Scrape the sides and bottom of your mixing bowl frequently with a rubber spatula to avoid unmixed flour pockets or lumpy batter.
At this point, your batter should be creamy, thick, and pale yellow ready for a colorful transformation.
How to Get Vibrant, Even Cake Colors with Food Coloring
The secret to eye-catching rainbow layers lies in bold colors that stay bright after baking. Here’s how to achieve that:
- Divide the batter evenly into six bowls. Use a digital kitchen scale for precision so each layer bakes at the same thickness. Each portion should weigh about the same.
- Add gel food coloring to each bowl. Start with 2–3 drops and stir well. Increase color slowly until the desired hue is achieved. For rainbow naked cake basics:
- Red
- Orange (mix red + yellow)
- Yellow
- Green
- Blue
- Purple (mix red + blue)
- Mix each portion gently with a separate spatula or rinse between uses to avoid muddying the colors.
| Color | Tip for Best Result |
|---|---|
| Red | Add a tiny bit of pink for warmth |
| Orange | Start with yellow, then tint with red |
| Green | Use leaf green gel for vibrancy |
| Blue | Royal or sky blue gel looks bright |
| Purple | Mix violet with a touch of blue |
Once colored, pour each batter into its own lined pan, smoothing the top with a spatula. Bake layers two or three at a time, rotating racks halfway through for even browning.
Learn more about layering techniques with our Halloween Naked Cake guide for tips on colorful layers without collapse.
Bake Time: 18–22 minutes per layer
Test Doneness: Insert a toothpick in the center it should come out clean or with a few crumbs.
After baking, cool the layers in their pans for 10 minutes, then gently invert onto a wire rack to cool completely before stacking.
Baking and Layering the Rainbow naked Cake
Once your colorful layers are baked and cooled, it’s time to move on to one of the most rewarding steps: building your Rainbow Naked Cake. Stacking those bright, even layers into a tall, clean cake takes patience, precision, and a few tried-and-true techniques.
Let’s walk through how to bake in batches (if needed), trim your layers, and assemble them into a stunning final structure.
Evenly Baking Multiple Layers Without Drying Out
If you don’t have six pans, don’t worry you can bake in batches. Here’s how to do it while keeping your batter fresh and layers consistent:
- Store unbaked batter in a cool spot while the first layers bake. Do not refrigerate, as it may change the rise.
- Line each pan with parchment paper, and lightly grease the sides with butter or nonstick spray.
- Bake 2–3 layers at a time, rotating the pans halfway through to prevent uneven browning.
- As soon as a batch is done, let those pans cool, clean them quickly, and reuse for the next colors.
Baking Tip: Avoid overbaking, as thin rainbow layers dry out fast. Stick with 18–22 minutes, and check with a toothpick around minute 18.
Once cooled, wrap each cake layer tightly in plastic wrap if you’re not assembling right away. They’ll stay moist for up to 24 hours at room temperature.
Cooling, Trimming, and Stacking the Layers
Cool each cake layer completely before stacking. Warm cakes can melt buttercream and cause the cake to slide.
Steps to Level and Stack Your Rainbow naked cake Layers:
- Level each cake using a serrated knife or cake leveler. Trim any domes so your layers stack flat.
- Place your bottom (usually purple or blue) layer on a cake board or serving plate. Add a small dollop of buttercream underneath to anchor it in place.
- Pipe or spread a ¼-inch layer of buttercream over each cake round using an offset spatula. Be consistent with the thickness so the cake stacks evenly.
- Repeat with each layer, going from darker to lighter colors (or reverse if preferred).
Don’t press down too hard gentle pressure keeps your cake from collapsing.
Once stacked, apply a crumb coat-a thin layer of buttercream around the sides that locks in crumbs and exposes the edges for the signature “naked” look. Smooth it with a bench scraper or offset spatula.
Refrigerate for 20–30 minutes to set the crumb coat before decorating further.
Want ideas on seasonal styling? Don’t miss our Fall Naked Cake version to see how we handled rustic textures and warm-toned layers.
Mastering the Rainbow Naked Cake Buttercream Technique
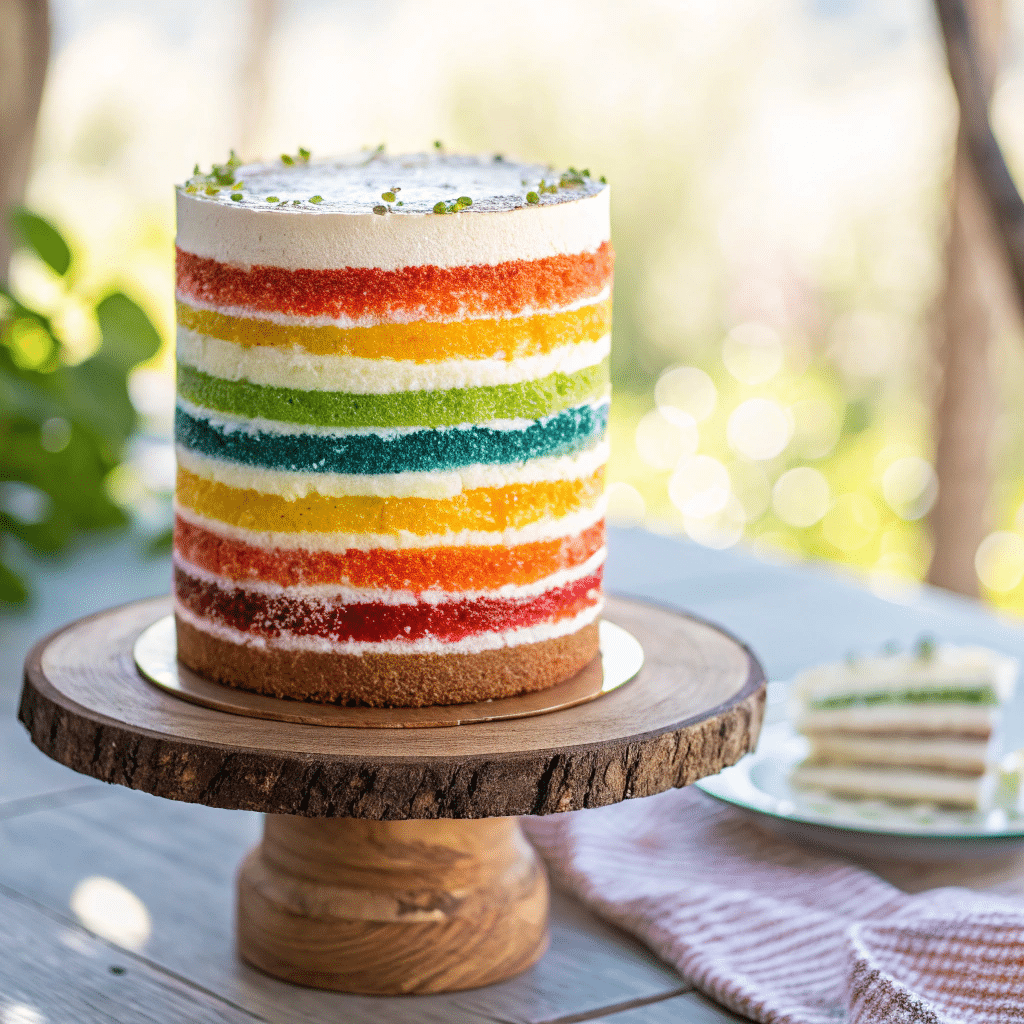
Now that your colorful layers are stacked, it’s time to perfect the signature finish: a thin veil of creamy frosting that lets the rainbow naked cake colors peek through. This is what makes a Rainbow Naked Cake so elegant yet playful the balance between exposed layers and smooth buttercream edges.
Whether you’re a buttercream beginner or a piping pro, this part will guide you through creating a flawless semi-naked effect with ease.
Creating a Smooth, Rustic Finish Without Over-Frosting
The goal with a Rainbow naked cake is just enough frosting to act as glue no more, no less. It’s minimal but still purposeful.
Here’s how to apply buttercream like a pro:
- Start with chilled layers. After stacking and applying your crumb coat, refrigerate your cake for 20–30 minutes. Cold layers are easier to frost without shifting.
- Use an offset spatula to apply a small amount of buttercream around the cake sides.
- Hold a bench scraper against the cake while slowly rotating it (use a turntable if you have one). This removes excess frosting and reveals the colorful layers underneath.
- Top it off with a slightly thicker buttercream layer to seal the top and keep it from drying out.
Want more inspiration? Check out our Halloween Naked Cake guide for spooky yet stunning buttercream techniques.
Texture tip: If you prefer a smooth look, chill your buttercream slightly before spreading. For a more rustic vibe, use a warm spatula for textured swirls.
Tips for Even Buttercream Layers Between Rainbow naked cake Tiers
Even spacing between layers helps prevent leaning or sliding. Here’s how to do it:
- Use a piping bag to create an even ring of frosting around the edge before filling the center. This locks in structure and helps with clean stacking.
- Eye-level check: After stacking each layer, squat down to check for evenness. Make small adjustments before moving on.
- Don’t overload the frosting between layers. Keep it around ¼ inch thick to maintain balance.
| Problem | Solution |
|---|---|
| Leaning tower | Level layers before stacking |
| Frosting bulging | Use less cream and chill layers |
| Crumbs in outer coat | Always crumb coat first, then chill |
This buttercream step gives your Rainbow Naked Cake its signature style. Keep it light and rustic for the best effect and let those rainbow layers be the main event.
Decorating Your Rainbow Naked Cake with Style
The beauty of a Rainbow Naked Cake lies in its vibrant interior but what you put on the outside adds the final magic. Because naked cakes embrace simplicity, the decorations are usually minimalist and creative, meant to highlight the color layers, not cover them.
In this section, you’ll find elegant, easy, and playful ways to top your cake for any occasion.
Minimalist Toppings That Highlight the Layers
Instead of overwhelming your cake with fondant or heavy décor, the Rainbow naked cake style uses soft, natural, or edible touches. These options elevate the presentation without hiding the rainbow beneath:
| Decoration | Why It Works |
|---|---|
| Fresh berries (raspberries, blueberries) | Adds pops of natural color that contrast with layers |
| Edible flowers | Provide a delicate, romantic finish—perfect for showers or weddings |
| Sprinkles or confetti | Great for birthdays and kid-friendly events |
| Macarons or meringues | Adds texture, color, and a touch of elegance |
| Colored drip glaze (optional) | A subtle drizzle adds drama without covering the cake |
Pro Tip: Keep the palette simple. Stick to 2–3 decorative elements that complement not compete with the rainbow layers.
Want ideas for seasonal or holiday spins? Looking for inspiration? Try our festive Christmas Naked Cake to see how a few candy canes and a dusting of powdered sugar can transform the look.
Creative Presentation Ideas for Birthdays and Events
Once your cake is frosted and topped, how you present it adds to the wow factor. Try these crowd-pleasing setups:
- Use a glass cake stand: Elevates the look and makes the layers visible from every angle.
- Add a cake topper: A personalized acrylic topper or glitter “Happy Birthday” sign finishes it with flair.
- Surround with matching mini cupcakes: Carry the rainbow naked cake theme through the dessert table.
- Coordinate with table colors: Match napkins, balloons, or party decor to your cake’s color scheme.
Planning a rustic wedding or garden party? A Rainbow naked cake with floral accents and soft lighting becomes an instant showpiece without the need for professional décor.
Tips for Storing and Serving Rainbow Naked Cake
You’ve spent time perfecting every colorful layer and applying the ideal amount of buttercream now it’s time to store and serve your Rainbow Naked Cake the right way. Because naked cakes aren’t fully sealed in frosting, they can dry out quicker than traditional cakes if not handled properly.
Follow these expert tips to keep your masterpiece fresh and presentation-ready until it’s time to slice.
Keeping the Cake Moist and Fresh Without Icing Overload
Since Rainbow naked cakes have exposed edges, air can dry out the sponge faster. Here’s how to lock in moisture without compromising the Rainbow naked cake aesthetic:
- Wrap it in plastic wrap if you’re not serving right away. Yes even after frosting. Chill it uncovered for 20–30 minutes to firm up the buttercream, then wrap loosely in plastic.
- Store in an airtight container if the cake fits, or place under a large glass dome on a cake stand.
- Keep refrigerated if storing for more than 24 hours. Remove 30–45 minutes before serving to bring it to room temperature for best texture.
If you’re serving outdoors or in warm weather, keep your cake in a cool place until just before the event.
Shelf life tips:
- Room Temp: 1 day (covered)
- Fridge: Up to 3 days
- Freezer: Up to 1 month (unfrosted layers)
For cake layer prep ahead of time, freeze each wrapped layer and thaw overnight in the fridge before frosting.
How to Make It Ahead and Transport It Safely
Need to take your rainbow naked cake to a birthday, bridal shower, or potluck? Plan your timeline and packaging to avoid smudged frosting or color bleeding.
To Make Ahead:
- Bake layers up to 3 days early, wrap tightly, and refrigerate or freeze.
- Frost and assemble 1 day before serving for the freshest texture and color vibrancy.
For Transporting:
- Place the cake on a non-slip cake board, then in a cake carrier or deep box with padding.
- Keep the cake chilled until transit. A chilled cake is more stable during movement.
- Drive carefully-place the cake flat in your trunk or on the floor, not on a seat.
Don’t miss our complete naked cake overview for more helpful tips on handling and displaying layered desserts with minimal frosting.
Common Mistakes to Avoid with Rainbow Naked Cakes
Even the most experienced bakers can hit a snag when making a Rainbow Naked Cake. With six layers, vibrant colors, and minimal frosting to hide imperfections, precision matters. But don’t worry if you know what to watch for, you can dodge the most common cake catastrophes and keep your rainbow stunning from the inside out.
Overbaking and Color Bleeding
Mistake 1: Overbaking the Layers
Thin cake layers bake fast, and even 2–3 extra minutes can make them dry. Dry cakes crack, crumble, and resist stacking neatly.
Fix: Bake at 350°F and begin checking at 18 minutes. Toothpick should come out with a few crumbs not bone dry.
Mistake 2: Color Bleeding Between Layers
Bright food coloring can bleed into white buttercream if the layers are too warm or overly moist.
Fix: Let layers cool completely before frosting. Use gel coloring instead of liquid to prevent excess moisture.
Frosting Failures and Crumb Control
Mistake 3: Frosting Too Much (or Too Little)
rainbow Naked cakes require balance. Too much buttercream hides your layers; too little causes the cake to shift and slide.
Fix: Use a piping bag to apply an even amount of buttercream between each layer, and scrape the sides gently for that signature semi-naked look.
Mistake 4: Skipping the Crumb Coat
Without a crumb coat, loose crumbs will drag through your outer layer, ruining the finish.
Fix: Always apply a thin base layer of buttercream (crumb coat), chill for 20–30 minutes, and then finish with your outer scrape.
Structural Slip-Ups
Mistake 5: Uneven Layers or Stacking
Uneven or untrimmed layers can lean, crack, or collapse.
Fix: Level each layer with a serrated knife or cake leveler. Stack on a flat, non-slip base, and check from all angles as you go.
Mistake 6: Building While Warm
Warm cakes + soft buttercream = sliding layers.
Fix: Cool each layer completely before assembly. Chill the stacked cake briefly to help it firm up.
Bonus Tip: Want a foolproof way to start? Try our easy layering approach from the Christmas Naked Cake and adapt it with rainbow colors.
Conclusion:
Making a Rainbow Naked Cake might take a few steps, but the result is pure magic a showstopping dessert that’s just as fun to eat as it is to look at. With bright layers, balanced buttercream, and a rustic-chic vibe, it’s a perfect cake for birthdays, baby showers, or any occasion that deserves color and celebration.
Whether you’re a beginner or experienced baker, this guide gives you everything you need to create a cake that wows every time. Discover great ideas like our unique naked cake styling tips to keep your baking on-trend.
FAQS:
What is a rainbow naked cake?
A rainbow naked cake is a multi-layered dessert featuring brightly colored sponge layers with minimal outer frosting. Unlike traditional cakes, it leaves the edges mostly exposed, showcasing its vibrant colors while still holding everything together with a thin coat of buttercream.
How do you make rainbow cake layers?
To make rainbow layers, divide your cake batter into six equal parts and add gel food coloring to each. Use red, orange, yellow, green, blue, and purple. Pour each into a separate 8-inch cake pan and bake individually or in batches. Once baked and cooled, stack with buttercream between each layer.
What frosting is best for a naked cake?
Buttercream is ideal. It’s thick enough to bind the layers while soft enough to spread thinly for that signature semi-naked finish. Avoid whipped cream or runny frosting they won’t hold the cake together well.
Can I make a rainbow naked cake ahead of time?
Yes. You can bake and freeze the layers up to a month ahead. Assemble the cake a day before serving and refrigerate. Bring to room temperature before slicing for best texture and flavor.
How do you keep a naked cake moist?
Wrap cooled layers in plastic wrap and store in an airtight container if baking ahead. After assembling, cover the entire cake with plastic wrap or store under a dome. The thin buttercream coating helps seal in moisture for 1–2 days.
Is food coloring safe for rainbow cakes?
Yes use high-quality, gel-based food coloring. It’s FDA-approved and gives bright color without changing the batter’s consistency. Avoid liquid food dyes, which can water down your batter and bake unevenly.