

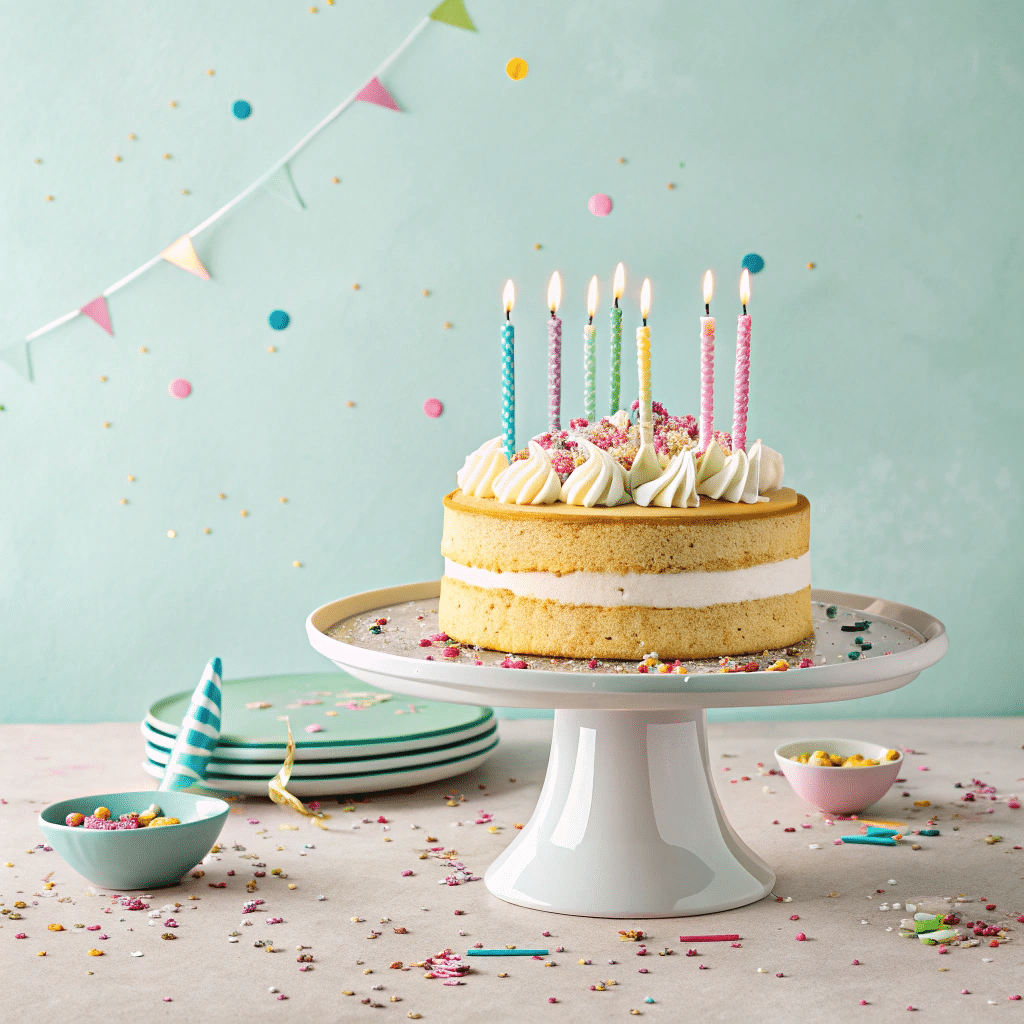
The naked cake is more than just a trending dessert it’s a rustic yet refined centerpiece that’s taken over birthdays, weddings, and Pinterest boards across the USA. With its signature minimal frosting and exposed layers, this cake style blends elegance and simplicity, proving that you don’t need fondant frills to impress. Whether you’re into home baking or planning a special celebration, this article unpacks everything about naked cakes from recipes and decorating tips to trends and curious nicknames like “funeral cake” and “miserable cake.
What is a Naked Cake?
History and Origins of Naked Cakes
The naked cake may seem modern, but its origins are rooted in traditional home baking. Before elaborate fondants and glossy glazes dominated the bakery scene, many cakes were simply stacked, filled with buttercream, and left unfrosted on the sides. This “unfinished” style began making waves again in the early 2010s when rustic wedding trends soared in popularity.
The aesthetic appeal lies in its simplicity bare cake layers showing off their golden edges, contrasted beautifully with soft, rich fillings. The concept quickly became a favorite for minimalist-themed events, especially in barn and outdoor wedding venues.
How Naked Cakes Became a Trend in Modern Baking
Food stylists, bakers, and bloggers helped push the naked cake into the spotlight. Its versatility was a game-changer: you could decorate it with anything from edible flowers to fresh fruits or herbs. Unlike traditional cakes that rely on visual polish, naked cakes flaunt their imperfections cracks, crumbs, and all.
Instagram and Pinterest became breeding grounds for viral naked cake designs, often featuring seasonal elements like lavender, figs, or rustic wood stands. This social media boom transformed it from an old-school cake style into a must-have dessert for upscale yet grounded celebrations.
Naked Cake vs. Traditional Cakes
Key Differences in Structure, Frosting & Decoration
The first thing you’ll notice when comparing a naked cake to a traditional frosted cake is the frosting or lack of it. Traditional cakes are fully covered with thick layers of buttercream, fondant, ganache, or whipped cream. Naked cakes, by contrast, showcase their layers with either no outer frosting or just a thin veil known as a crumb coat.
| Feature | Naked Cake | Traditional Cake |
|---|---|---|
| Outer Frosting | Minimal or none | Full frosting or fondant |
| Visual Style | Rustic and natural | Polished and finished |
| Texture | Moist, soft with crumb exposure | Smooth and sealed texture |
| Decorations | Flowers, fruits, herbs | Edible toppers, fondant décor |
| Ideal For | Rustic weddings, birthdays | Formal events, themed parties |
A semi-naked cake also exists between the two a thin layer of frosting is applied and then lightly scraped off to reveal some cake underneath, giving it a “peek-a-boo” finish that’s very on-trend.
Another significant difference is in the assembly and display. Naked cakes often feature uneven, hand-applied decorations like fresh berries or florals, lending them a handcrafted charm, while traditional cakes focus on symmetry and precision.
Why Choose a Naked Cake for Special Occasions
So, why go naked? For starters, it’s a refreshing change in a landscape dominated by overly synthetic designs. Many people prefer naked cakes because:
- They’re less sweet due to less frosting
- They offer a cleaner, more natural appearance
- They’re often more budget-friendly
- They photograph beautifully, especially at outdoor events
From barn weddings to boho-chic birthdays, the naked cake gives off an effortless elegance that appeals to both modern tastes and vintage sensibilities.

Best Naked Cake Recipes You Can Try at Home
Classic Vanilla Naked Cake Recipe
If you’re craving the timeless flavor of vanilla layered with creamy frosting and a rustic touch, this classic naked cake recipe is your go-to. It’s rich, moist, and surprisingly simple to make even for beginner bakers.
Here’s what you’ll need:
Cake Ingredients:
- 3¾ cups (443g) sifted all-purpose flour
- 2 tsp baking powder
- ¾ tsp baking soda
- 1 tsp salt
- 1½ cups (340g) unsalted butter, softened
- 2 cups (400g) granulated sugar
- 5 large eggs (room temperature)
- 1 tbsp pure vanilla extract
- 1¾ cups (420ml) buttermilk (room temperature)
- Optional: 1–2 cups fresh raspberries
Vanilla Buttercream Frosting:
- 1½ cups (340g) unsalted butter, softened
- 5–6 cups (600–720g) confectioners’ sugar
- 5–6 tbsp (75–90ml) heavy cream
- 1 tsp vanilla extract
- ¼ tsp salt
Instructions Overview:
- Preheat oven to 350°F and prepare three 9-inch pans.
- Mix dry ingredients (flour, baking soda, powder, salt).
- Cream butter and sugar, then add eggs and vanilla.
- Alternate mixing dry ingredients and buttermilk until smooth.
- Divide batter evenly across pans and bake for 25–26 minutes.
- Cool, level, and stack cakes with frosting between each layer.
- Use a bench scraper to smooth frosting or leave it rustic.
- Decorate with berries or flowers and chill before serving.
Pro Tip: Use parchment rounds in each pan to ensure clean removal.
Print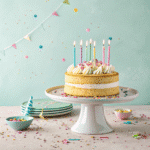
Naked Cake The Best 9-Step Guide to Trendy & Rustic Cakes
- Total Time: 51
- Yield: 12 1x
Description
This naked cake is simply stunning with fresh berries, vanilla cake, and vanilla buttercream.
Ingredients
- 3 and 3/4 cups (443g) sifted all-purpose flour* (spooned & leveled)
- 2 teaspoons baking powder
- 3/4 teaspoon baking soda
- 1 teaspoon salt
- 1 and 1/2 cups (340g) unsalted butter, softened to room temperature
- 2 cups (400g) granulated sugar
- 5 large eggs, at room temperature
- 1 Tablespoon pure vanilla extract (yes, Tbsp!)
- 1 and 3/4 cups (420ml) buttermilk, at room temperature*
- optional: 1-2 cups fresh raspberries (or other berry, see note)
Vanilla Buttercream
- 1 and 1/2 cups (340g) unsalted butter, softened to room temperature
- 5–6 cups (600-720g) confectioners’ sugar
- 5–6 Tablespoons (75-90ml) heavy cream
- 1 teaspoon pure vanilla extract
- 1/4 teaspoon salt
- finishing decorations (see post above for inspiration!)
Instructions
-
Preheat oven to 350°F (177°C). Grease three 9-inch round cake pans, line with parchment paper rounds, then grease the parchment paper. Parchment paper helps the cakes seamlessly release from the pans. (If it’s helpful, see this parchment paper rounds for cakes video & post.)
-
Make the cake: Whisk the flour, baking powder, baking soda, and salt together in a large bowl. Set aside. Using a handheld or stand mixer fitted with a paddle or whisk attachment, beat the butter and sugar together on high speed until smooth and creamy, about 3 minutes. Scrape down the sides and up the bottom of the bowl with a silicone spatula as needed. On medium-high speed, add 1 egg at a time, beating well after each addition. Beat in the vanilla extract. Scrape down the sides and up the bottom of the bowl with a rubber spatula as needed. Scrape down the sides and up the bottom of the bowl with a rubber spatula as needed.
-
With the mixer on low speed, add the dry ingredients in three additions alternating with the buttermilk, beginning and ending with the dry ingredients, and mixing each addition just until incorporated. Do not overmix this batter. The batter will be smooth, velvety, and slightly thick.
-
There is about 8 cups of batter total, so each layer will be 2 and 2/3 cups. Pour/spread batter evenly into prepared cake pans. If you’re worried about uneven cake layers, you can use a kitchen scale and weigh the cake pans for accuracy. (The weight of just the batter in my cake pans was about 1 lb 6 ounces.)
-
Bake for around 25-26 minutes or until the cakes are baked through. To test for doneness, insert a toothpick into the center of the cake. If it comes out clean, it is done. Allow cakes to cool completely in the pans set on a wire rack. The cakes must be completely cool before frosting and assembling.
-
Make the frosting: In a large bowl using a handheld mixer or stand mixer fitted with a whisk or paddle attachment, beat the butter on medium speed until creamy—about 2 minutes. Add 5 and 1/2 cups confectioners’ sugar, 5 Tablespoons heavy cream, the vanilla extract, and salt with the mixer running on low. Increase to high speed and beat for 3 full minutes. Add 1/2 cup more confectioners’ sugar if frosting is too thin, 1 more Tablespoon cream if frosting is too thick, or a pinch more of salt if frosting is way too sweet. Yields about 4.5 cups of frosting.
-
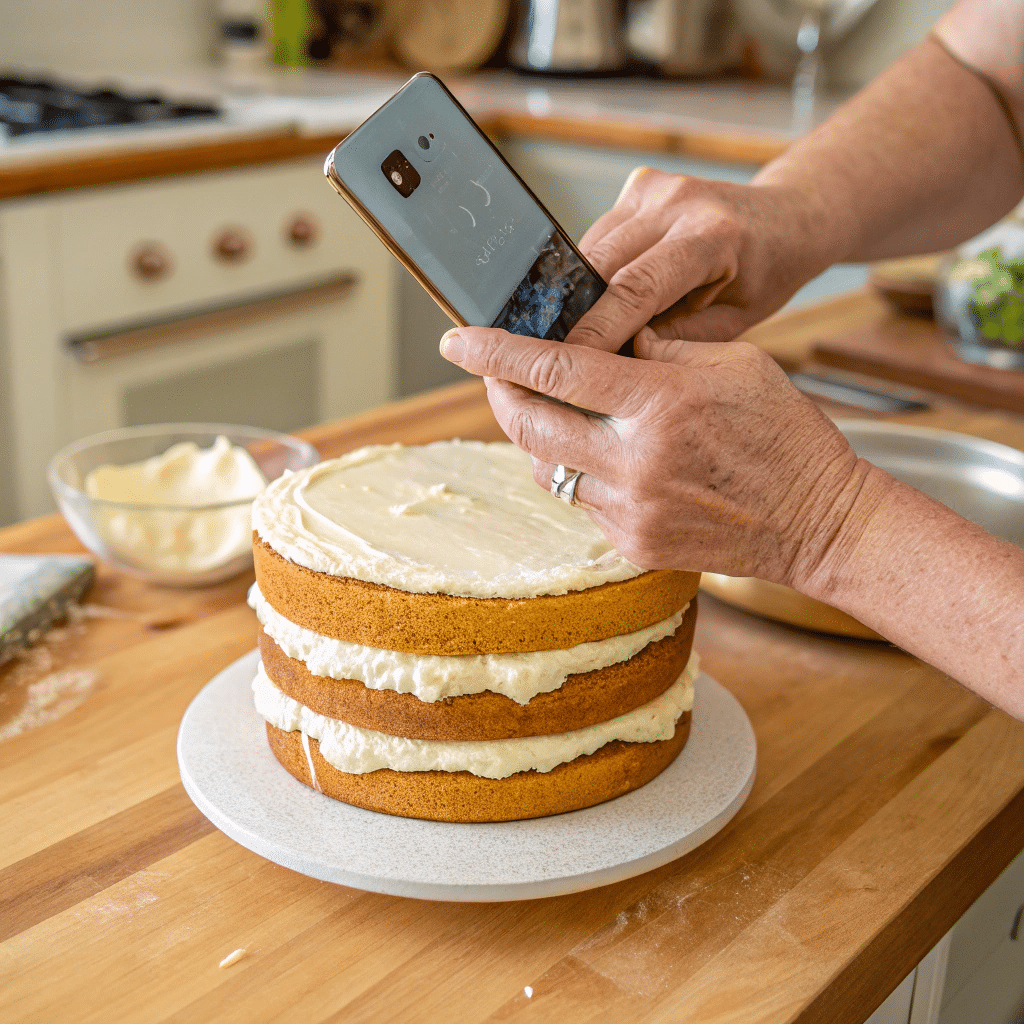
Assemble and decorate the cake: Watch the video above for a tutorial on assembling and decorating this naked cake. First, using a large serrated knife, slice a thin layer off the tops of the cakes to create a flat surface. Discard (or crumble over ice cream!). Place 1 cake layer on your cake stand, cake turntable, or serving plate. Spread 1 and 1/2 cups of frosting evenly on top. If using, dot half of the raspberries around the rim. Flatten them down into the frosting as best you can so the cake layer on top is sturdy. Top with 2nd cake layer and evenly cover the top with another 1 and 1/2 cups of frosting and more (flattened!) raspberries around the rim. You can sprinkle a few leftover raspberries in the center, too. (Like I did in the video.) Top with the third cake layer. Spread the remaining frosting on top and all around the sides using an icing spatula. Use a bench scraper to smooth out the frosting on the sides of the cake. If you’re making a full naked cake, just spread the remaining frosting on top of the cake. If you have leftover frosting, you can freeze it for up to 3 months and thaw in the refrigerator for next time.
-
Decorate the cake with garnishes.
-
Refrigerate the cake for 2-3 hours or up to 1 day before slicing and serving. If chilling for more than a few hours, loosely cover with plastic wrap after 1 hour of refrigeration. (The frosting will “set” after about 1 hour and the plastic wrap won’t really ruin your frosting at that point.) And if you’re chilling for more than a few hours, I suggest decorating with garnishes right before serving (so as not to wilt the flowers, etc).
-
Cover and store leftover cake at room temperature for 1-2 days or in the refrigerator for up to 1 week.
Notes
- Make Ahead Instructions: The cake layers can be baked, cooled, and covered tightly at room temperature overnight. Likewise, the frosting can be prepared then covered and refrigerated overnight. Assemble and frost the cake the next day when you are ready to serve. The frosted cake can be refrigerated for up to 1 day—see step 8. The frosted cake can also be frozen up to 2-3 months. Thaw overnight in the refrigerator and bring to room temperature before serving.
- Flour: Sift flour before measuring.
- Buttermilk: If you don’t have buttermilk, you can make a DIY buttermilk substitute. Add 1 Tablespoon of white vinegar or lemon juice to a liquid measuring cup. Then add enough whole milk to the same measuring cup until it reaches 1 and 3/4 cups. (In a pinch, lower fat or nondairy milks work for this soured milk, but the cake won’t taste as moist or rich.) Stir it around and let sit for 5 minutes. The homemade “buttermilk” will be somewhat curdled and ready to use in the recipe.
- Raspberries: The raspberries will leak some juice around the edges after a day or so. I would leave the berries out if you’re making this cake in advance for a party or celebration.
- Room Temperature Ingredients: All refrigerated items should be at room temperature so the batter mixes together easily and evenly. Learn more about why room temperature ingredients are important.
- I used this cake recipe for my checkerboard cake. The cake layers are slightly thicker here because this cake is 3 layers instead of 4. If you want to make the naked cake as a 4 layer cake, use 2 cups of batter for each cake layer and bake for 23-24 minutes or until a toothpick comes out clean.
- Prep Time: 25
- Cook Time: 26
- Category: naked cake recipes
- Method: N/A
- Cuisine: American
Nutrition
- Calories: 370
Chocolate Naked Cake & Semi-Naked Variations
Want something richer? Consider a chocolate naked cake layered with rich mocha buttercream or airy whipped ganache. Here’s how you can switch it up:
Simple Tweaks:
- Replace 1 cup flour with unsweetened cocoa powder
- Add 1 tsp espresso powder to boost chocolate flavor
- Use chocolate chips in batter for texture
- Top with dark chocolate curls or cherries
Semi-Naked Option: Apply a light crumb coat of frosting around the outside and scrape most off with a bench scraper. This leaves a hint of frosting while still showing cake edges.
Flavor Variations:
- Lemon + raspberry
- Strawberry shortcake naked cake
- Red velvet semi-naked cake
- Carrot cake with cream cheese frosting
Each variation delivers that perfect balance of rustic charm and gourmet flavor.
Chocolate Naked Cake & Semi-Naked Variations
Want something richer? Try a chocolate naked cake layered with mocha buttercream or whipped ganache. Here’s how you can switch it up:
Simple Tweaks:
- Replace 1 cup flour with unsweetened cocoa powder
- Stir in 1 teaspoon of espresso powder to enhance the richness of the chocolate flavor.
- Use chocolate chips in batter for texture
- Top with dark chocolate curls or cherries
Semi-Naked Option: Apply a light crumb coat of frosting around the outside and scrape most off with a bench scraper. This leaves a hint of frosting while still showing cake edges.
Flavor Variations:
- Lemon + raspberry
- Strawberry shortcake naked cake
- Red velvet semi-naked cake
- Carrot cake with cream cheese frosting
Each variation delivers that perfect balance of rustic charm and gourmet flavor.
How to Make the Perfect Naked Cake
Essential Ingredients & Kitchen Tools
Perfecting a naked cake starts with nailing your ingredients and tools. Since the cake layers are visible, they need to be evenly baked, moist, and golden brown. No room to hide flaws here.
Key Ingredients You Shouldn’t Substitute:
- All-purpose flour: Go for sifted and spooned & leveled to avoid a dense texture.
- Room-temperature butter and eggs: These ensure a smooth, even batter.
- Buttermilk: Adds moisture and tang for a richer crumb.
- Real vanilla extract: Skip the imitation; naked cakes rely on bold base flavors.
- Fresh berries or florals: For decorating naturally and seasonally.
Must-Have Kitchen Tools:
| Tool | Purpose |
|---|---|
| Stand or hand mixer | Creams butter & sugar evenly |
| 9-inch round cake pans | Standard for layering |
| Parchment paper rounds | Helps release layers cleanly |
| Bench scraper | Smooths frosting (if using) |
| Serrated knife | Levels cake layers cleanly |
| Cake turntable (optional) | Makes decorating easier |
Keep your frosting simple: vanilla buttercream or whipped cream works best, as it blends beautifully into the soft crumb and won’t overpower the flavor or appearance.
Step-by-Step Baking and Layering Guide
Let’s walk through the essential steps that take your cake from batter to showstopper.
Step 1: Bake Even Layers
- Preheat your oven to 350°F (177°C).
- Grease and line your cake pans with parchment rounds.
- Divide the batter evenly (around 2⅔ cups per pan).
- Bake for 25 to 26 minutes, or until a toothpick inserted in the center comes out clean.
- Cool completely before frosting don’t rush this step!
Step 2: Level Your Layers
- Use a serrated knife to remove domed tops.
- Flat layers make for stable, attractive stacking.
Step 3: Stack and Fill
- Set the first cake layer on a cake stand or turntable.
- Spread 1½ cups of buttercream evenly.
- Add berries around the rim if desired gently press into the frosting.
Step 4: Continue Layering
- Repeat with second and third layers.
- Use remaining frosting on top or around the cake edge lightly for a semi-naked look.
Step 5: Smooth or Leave Rustic
- For clean sides, use a bench scraper to thin out frosting.
- For a true naked cake, leave the sides untouched.
Step 6: Decorate
- Top with florals, fruit, herbs, or even edible gold flakes.
- If using flowers, make sure they’re food-safe or use flower picks.
Decorating a Naked Cake Like a Pro
Using Fresh Flowers, Fruits & Rustic Garnishes
Decorating a naked cake is where the artistry truly begins. With its bare sides and clean stack, this cake acts as a blank canvas for elegant, natural elements. Unlike fondant-covered cakes, the naked cake thrives on simplicity.
Top Natural Decorations:
| Decoration Type | Best Choices | Pro Tip |
|---|---|---|
| Flowers | Roses, peonies, lavender, eucalyptus | Use organic, non-toxic blooms |
| Fruits | Raspberries, figs, strawberries | Dust with powdered sugar for flair |
| Herbs | Rosemary, mint, thyme | Use sparingly for aroma & texture |
| Other | Nuts, edible gold leaf, citrus slices | Add contrast with color and shape |
Flower Safety Tip: Always wrap flower stems in floral tape or use picks before inserting into the cake. Not all beautiful blooms are safe for food.
Arrangement Techniques:
- Decorate the top tier only for a modern touch
- Cluster berries and flowers asymmetrically for a rustic vibe
- Use a ring of florals around the bottom base for dramatic elevation
- Add a touch of freshness with handpicked herbs or lush foliage.
Top Buttercream Frosting Styles for Naked Cakes
Even with minimal frosting, the type of buttercream you use can completely change the cake’s personality.
3 Popular Buttercream Options:
- Classic Vanilla Buttercream
- Smooth and creamy
- Perfect for birthday and celebration cakes
- Holds flowers and fruits well
- Swiss Meringue Buttercream
- Silky and less sweet
- Ideal for weddings and summer events
- More stable in warm temperatures
- Chocolate Buttercream
- Pairs beautifully with dark sponge or red velvet
- Great for semi-naked finishes with a rich color contrast
Pro Tips for Buttercream Application:
- Use an icing spatula to spread evenly between layers
- Apply a light crumb coat for semi-naked effect
- Scrape down with a bench scraper for texture contrast
- Chill before decorating to lock structure and prevent smears
When done right, buttercream doesn’t just hold your cake together it elevates the whole visual with texture, style, and balance.
Naked Cake Ideas for Every Occasion
Birthday Naked Cakes – Simple Yet Elegant
Who says birthday cakes need to be loaded with frosting and fondant? A naked cake birthday style brings just the right balance of sweetness and charm perfect for kids, teens, or adults who prefer a more natural and stylish look.
Popular Birthday Naked Cake Styles:
| Style | Features | Best For |
|---|---|---|
| Berry Burst | Layers filled with raspberries and whipped cream | Summer birthdays |
| Confetti Naked Cake | Funfetti sponge with minimal icing | Kids’ parties |
| Chocolate-Drizzle Naked | Chocolate sponge with ganache and strawberry topping | Teen and adult birthdays |
| Mini Naked Cakes | Small 2-layer individual cakes | Dinner parties or favors |
You can also personalize birthday naked cakes with edible number toppers, candles, or custom messages written in chocolate.
Wedding Naked Cakes – Minimal but Magical
Nothing says “rustic romance” quite like a naked cake wedding centerpiece. Whether it’s a country barn wedding or a chic garden ceremony, naked cakes blend beautifully with floral centerpieces, vintage décor, and natural surroundings.
Why Brides & Grooms Love Them:
- Matches boho, rustic, vintage, or minimalist wedding themes
- Displays seasonal fruits and florals elegantly
- Easy to serve and often more affordable than fondant cakes
- Looks stunning with tiered wood stands or antique platters
Popular Wedding Combinations:
- Vanilla cake + lavender buttercream + fig topping
- Lemon sponge + mascarpone + fresh berries
- Red velvet + cream cheese + rose petals
Decorating Ideas for Wedding Naked Cakes:
- Use multiple tiers with cascading florals like roses or eucalyptus
- Add a custom wooden cake topper with initials or wedding date
- Layer in seasonal fruits like cherries, pomegranate, or blood orange
Naked Cake Trends in 2025
Most Popular Flavors & Themes This Year
As we settle into 2025, the naked cake isn’t going anywhere. In fact, it’s evolving into even more creative territory, where flavor meets aesthetic in wildly unique ways. Whether you’re baking at home or ordering from a boutique bakery, these trends are dominating the naked cake scene this year.
Trending Flavors in 2025:
| Flavor Trend | Description |
|---|---|
| Lemon Thyme Naked Cake | Light, herby citrus sponge with whipped honey frosting |
| Earl Grey and Lavender | Tea-infused sponge with delicate floral buttercream |
| Salted Caramel Drizzle | Caramel naked cake with pecan garnish and flaky salt |
| Dark Chocolate Raspberry | Rich sponge with tart berries and cocoa nibs |
| Almond Fig & Honey | Nutty base paired with fresh fig layers and honey drizzle |
These flavors not only taste amazing but offer visual texture and color that elevate the cake’s natural charm.
Viral Naked Cake Designs from Social Media
Thanks to TikTok and Instagram, cake decorators are reinventing the naked cake every day. Here are some of the most shared and loved designs gaining momentum online in 2025:
1. Minimalist Single-Tier Cakes
Perfect for micro-weddings or intimate birthdays. Usually decorated with only two or three elements—like a single stem flower, gold leaf, or a subtle stencil.
2. Textured Buttercream Finish
Using offset spatulas and comb scrapers, bakers are creating subtle waves or ribbed textures that add elegance to the naked aesthetic.
3. Stacked Fruit Garnishes
Layered blueberries, figs, and blackberries are being arranged in geometric or cascading patterns across tiers for a more structured visual.
4. Deconstructed Cake Boards
Instead of serving slices, the naked cake is displayed in parts—sponge, fillings, toppings—letting guests build their own flavor stacks.
5. Petal-Dusted Naked Cakes
A new floral style where dried, edible flower petals are dusted over buttercream, offering color without the bulk of whole blooms.
Check out our Naked Cake Design Gallery for visual inspo straight from trending feeds.
These trends reflect a continued movement toward personalization, sustainability, and natural elegance in the world of cake design.
Conclusion:
From rustic weddings to elegant birthday parties, the naked cake proves that less really can be more. It strips away the fuss and lets pure flavor and natural beauty take center stage. Whether you’re a home baker experimenting with minimalism or someone looking to order a custom dessert that leaves an impression—naked cakes offer versatility, charm, and a delicious bite of simplicity.
FAQs
What is a naked cake?
A naked cake is a layered cake with little to no outer frosting, intentionally exposing its cake layers and fillings for a natural, rustic look. It’s often filled with buttercream, ganache, or whipped cream between layers and decorated with fresh fruit, flowers, or minimal garnishes. Its appeal lies in its simplicity less sugar, more flavor, and a raw elegance that’s perfect for weddings, birthdays, and casual celebrations.
Why is it called a funeral cake?
The term “funeral cake” can sometimes be confused with naked cake, though they are not the same. Historically, a funeral cake referred to a dense, dark cake (often spiced or with dried fruit) served at memorial services in the 18th and 19th centuries, particularly in the southern U.S. and parts of Europe. The simplicity of naked cakes has drawn comparisons, but the term is more about tradition than style.
Why is it called miserable cake?
“Miserable cake” (or gâteau misérable) is a Belgian sponge cake traditionally made with almond flour and layered with buttercream. It earned its name from the fact that it used only basic, “miserable” ingredients during wartime. Though it’s often mistaken as a reference to the rustic look of naked cakes, the two are not directly related though both embrace minimalism in different ways.
Why is it called Devil cake?
Devil’s food cake is a rich, moist chocolate cake with a deep cocoa flavor often darker and more intense than standard chocolate cake. The name contrasts it with “angel food cake,” which is light and airy. While some chocolate naked cakes use devil’s food layers, the “devil” name is purely flavor-based and has nothing to do with the naked cake aesthetic.
What is deodorant cake?
Despite the strange phrasing, “deodorant cake” has nothing to do with edible cakes. It refers to the solid, cake-like form of deodorants you find in stick packaging. Sometimes, due to texture and shape, people casually refer to it as “deodorant cake.” It’s unrelated to naked cakes and should definitely not be served at your next birthday party.