
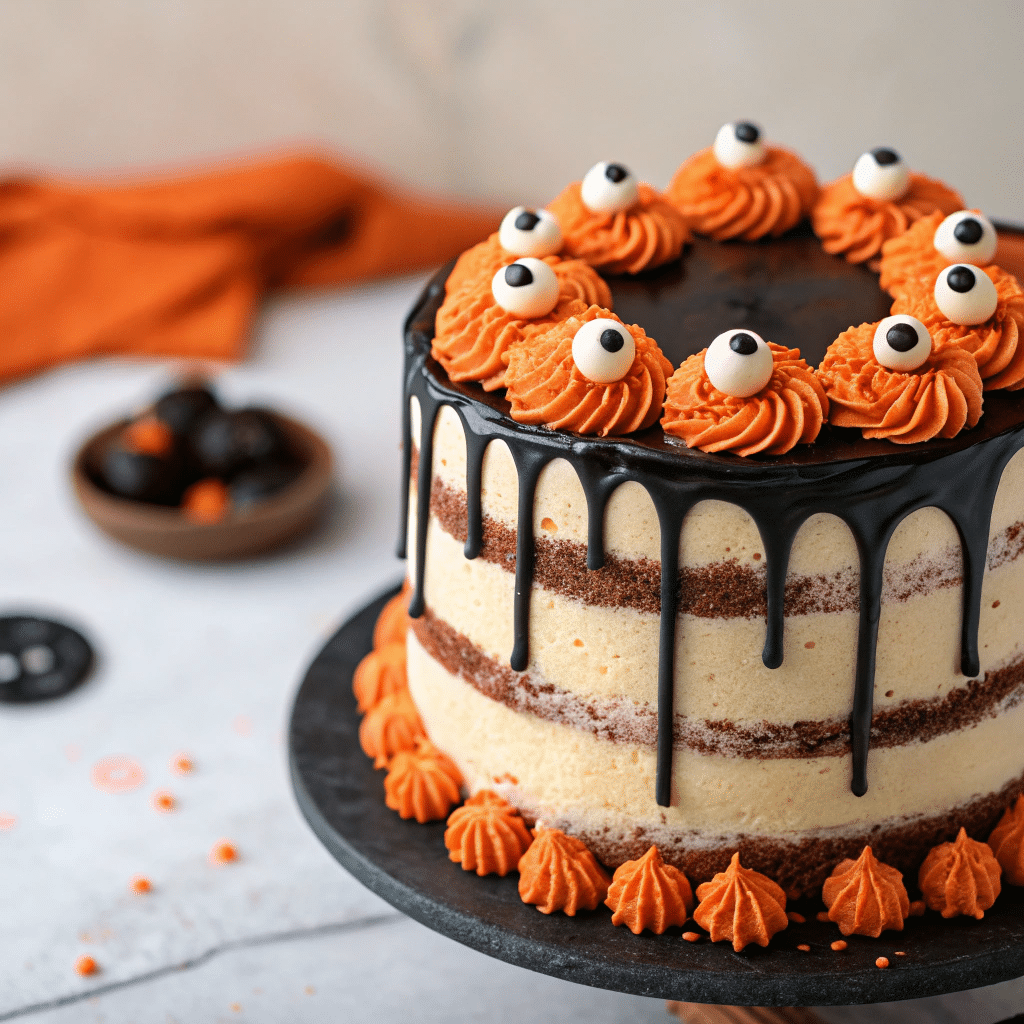
As Halloween rolls in with its eerie charm and sugary temptations, there’s one dessert stealing the spotlight at fall parties: the Halloween Naked Cake. This trendy, minimalist-style cake isn’t just Instagram-worthy it’s incredibly fun to make and even more delightful to eat. Whether you’re planning a ghoulish gathering or a classy fall dinner, a Halloween naked cake adds just the right amount of spooky flair without going over the top.
In this guide, you’ll learn everything from what makes these cakes “naked” to spooky decoration ideas, flavor combos, and baking tips. Plus, we’ll answer the top FAQs that Americans are searching for online and even guide you through creating vegan and gluten-free versions. Discover great ideas like this one from our post on fall naked cakes it’s the perfect autumn dessert inspiration.
Let’s dive into the ghostly layers of this delicious trend!
What Is a Halloween Naked Cake?
Understanding the Naked Cake Trend
Before we get into the spooky side of things, let’s break down the term “Halloween naked cake.” A naked cake refers to a layer cake that skips the heavy outer coating of buttercream. Instead, it flaunts its layers with just a hint of frosting in between and on top. The goal? A rustic, organic look that feels more like a handcrafted dessert than a commercial bake.
This trend has been wildly popular at weddings and baby showers and now, it’s creeping its way into Halloween naked cake celebrations, becoming a go-to dessert for October gatherings.
What Makes a Halloween naked cake?
Unlike traditional fully frosted cakes, a Halloween naked cake showcases its crumb texture and layered beauty. You may see a semi- Halloween naked cake with a light sweep of frosting around the edges for a faded effect, but a true Halloween naked cake leaves much of the cake exposed. That exposure creates contrast when you add Halloween-themed colors and decorations, like purple filling, blood-red sauce, or black chocolate drips.
This minimal frosting style not only looks stunning it also saves time. Less icing means less prep, and the focus is truly on flavor and presentation.
How Halloween Naked Cakes Stand Out from Other Seasonal Desserts
Fall desserts like pumpkin pies and caramel apples are classic, but a Halloween naked cake brings an unmatched combination of creativity and visual appeal. You can design it to fit any Halloween theme, from kid-friendly ghosts to elegant gothic.
What really makes it unique:
- You can choose dark, dramatic cakes like chocolate or red velvet.
- Decorations sit right on top and between layers no hiding!
- You can even style the cake to look like it’s bleeding with raspberry sauce or melting with ganache.
Check out this base idea in our naked cake inspiration post for more layering techniques that work with holiday themes.
A Halloween naked cake doesn’t just taste good it becomes part of your decor!
Why You Should Bake a Halloween Naked Cake This Season
Perfect for Parties, Kids, and Adults Alike
A Halloween Naked Cake isn’t just another fall treat it’s the star of the dessert table. Whether you’re hosting a haunted house bash or a cozy family dinner, this cake style hits the mark. The exposed layers and simple design make it easy to adapt for all audiences. Want something spooky but cute for the kids? Add edible ghosts and candy eyeballs. Hosting an adults-only dinner? Use rich, dark chocolate and elegant blackberries with gold leaf for a gothic flair.
It’s one of the rare desserts that bridges generations. Kids love the visual appeal. Adults appreciate the balance between rich cake and restrained frosting. Plus, it’s easy to slice and serve no collapsing layers or overly sugary messes.
And let’s be real Halloween can get hectic. You don’t want to spend hours decorating a cake only to cover it all in fondant. A Halloween naked cake offers effortless elegance and delicious flavor without the fuss.
Print
Halloween Naked Cake
- Total Time: 45
- Yield: 16 1x
Ingredients
- 1 batch Grain-Free Chocolate Mud Cake
Pumpkin Spice Cake
- 1 1/3 cups (165g) Cassava Flour
- 1/2 Tbsp White Vinegar
- 1 tsp Baking Soda
- 1 Tbsp Pumpkin Pie Spice
- 1/2 cup Maple Sugar
- 1/2 cup Coconut Sugar
- 1/4 tsp Salt
- 6 Tbsp Grass-Fed Butter or Ghee, cut into Tbsp portions, room temperature
- 2 Eggs
- 2 Tbsp Avocado Oil
- 1/2 (15 oz) can Pumpkin Puree, not pumpkin pie filling
- 1/4 cup Unsweetened Dairy-Free Milk, we prefer almond or cashew
- 1/2 tsp Pure Vanilla Extract
Vanilla Buttercream
- 2 cup (4 sticks) Grass-Fed Butter or Spectrum Shortening (for dairy-free), room temperature
- 6 cups Pure Cane Sugar
- 6 Tbsp Arrowroot or Tapioca Starch
- 1/2 tsp Salt
- 2 Tbsp Heavy Whipping Cream or Coconut Cream (for dairy free)
- 3 tsp Pure Vanilla Extract
Black Buttercream
- 1 cup (2 sticks) Grass-Fed Butter or Spectrum Shortening (for dairy-free), room temperature
- 3 cups Pure Cane Sugar
- 3 Tbsp Arrowroot or Tapioca Starch
- 1/2 tsp Salt
- 3 Tbsp Heavy Whipping Cream or Coconut Cream (for dairy free)
- 3 tsp Pure Vanilla Extract
- 1/4 cup Black Onyx Cocoa Powder
- 2 capsules Activated Charcoal
Purple Slime (White Chocolate Ganache)
- 1 cup Heavy Whipping Cream or Coconut Cream (for dairy free)
- 2 cups White Chocolate, (this is not paleo or dairy-free)
- Color Kitchen Foods Red Color
- Color Kitchen Foods Blue Color
- Glycerine
Decorations
- Enjoy Life Dark Chocolate Chunks
- White Chocolate, (this is not paleo or dairy-free)
- Color Kitchen Foods 5-pk Food Colors
- Green/Purple/White Sprinkles
- Additional Cane Sugar
- Glycerine
Instructions
Grain-Free Chocolate Mud Cake
- Prepare the cake as listed here. Fill three 6″ cake pans equally and bake as directed. Set aside and cool, then carefully remove from pan and let cool completely on a wire rack.
Pumpkin Spice Cake
- Preheat oven to 350°F. Lightly grease two 6″ cake pans with coconut oil, cut a parchment circle to fit the bottom of the pan, place it in the pan, and lightly grease that as well. Set aside.
- In a large mixing bowl, add the cassava flour, vinegar, baking soda, pumpkin pie spice, maple sugar, coconut sugar, and salt. Using a stand mixer or hand mixer on low speed, blend for about 30 seconds or until everything is well combined.
- Add the butter/ghee a few chunks at a time. Mix until the dry ingredients are combined with the butter and look like coarse sand, scraping the sides of the bowl as needed. The mixture should stick together a bit if you try to pinch it together.
- In a separate bowl, combine the eggs, oil, pumpkin, milk, and vanilla. Whisk until combined and smooth and set aside.
- With the mixer on low speed, very slowly add 1/2 of the egg mixture to the flour mixture. Increase the speed to medium for 2 minutes. Scrape bottom and sides of the bowl. Add 12 of the remaining egg mixture and beat for about 30 seconds. Add the remaining egg mixture and beat another 30 seconds.
- Pour the batter evenly between the prepared cake pans and bake in the preheated oven for for 30-35 minutes, or until a toothpick inserted in the center comes out clean. Cool in pans for about 10 minutes then invert onto a wire rack, remove pans, and cool completely before frosting.
Powdered Sugar
- Use all the sugar for both buttercream recipes so you only have to do this process once.
- In a food processor or high powdered blender (I use my Blendtec for this and it’s done in under 15 seconds), Add 1/3 of the sugar and half of the arrowroot. Blend on high speed until the pitch of the blender changes and the sugar has turned to powder. This shouldn’t take long and you don’t want to melt the sugar by running the blender too long. Repeat 2 more times with the remaining sugar/starch. Set aside.
Vanilla Buttercream
- In the bowl of a stand mixer fitted with the paddle attachment, beat the butter/shortening on a medium speed for 30 seconds, until smooth. Slowly add in the powdered sugar, 1 cup at a time. Alternate with small splashes of cream.
- Once fully mixed, add in the vanilla and salt, and beat on medium low until the ingredients are fully incorporated, and the desired consistency is reached. If the frosting is too thick, add in cream (1 teaspoon at a time). If the frosting is too thin, add in more powdered sugar (quarter of a cup at a time).
- Some of this frosting will be used with the Color Kitchen Food Colors for the accents, so it’s best prepared the night before so the colors have time to intensify overnight.
Black Buttercream
- In the bowl of a stand mixer fitted with the paddle attachment, beat the butter/shortening on a medium speed for 30 seconds, until smooth. Slowly add in the powdered sugar, 1 cup at a time. Alternate with small splashes of cream.
- Once fully mixed, add in the vanilla and salt, and beat on medium low until the ingredients are fully incorporated, and the desired consistency is reached. If the frosting is too thick, add in cream (1 teaspoon at a time). If the frosting is too thin, add in more powdered sugar (quarter of a cup at a time). Once fully mixed, add in the black onyx cocoa and the contents of the charcoal capsules (not the actual outer capsules themselves). Slowly mix to fully incorporate without adding in too much extra air.
- The longer this frosting sits, the darker the color will get, so it’s best prepared the night before.
Colored Frosting
- Place the contents of all 5 Color Kitchen Food Color packets in 5 separate bowls. Add a small amount of glycerine to each bowl and stir to combine fully until you get a thin gel paste.
- Put about 1/2 cup of white frosting in 3 bowls (1/2 cup in each bowl). Add orange gel to one, green to another, and both red and blue in the last. Don’t use all the coloring, maybe just 1/4 of it. Stir each bowl of frosting separately until the colors are completely combined and smooth. Remember they will darken as they sit overnight, but if they are too light, add just a touch more gel and mix again.
- Place each of the colored frostings in their own piping bags, twist and seal the ends, and set aside until it’s time to use them.
Marbled Chocolate Bark & Mini Pumpkins
- Add about a 1/4 cup of the cane sugar to a jar, container, or bag that can be tightly sealed. Add a drop of the orange Color Kitchen gel you prepared for the frosting, seal the container tight, and shake shake shake until the sugar turns orange. Set aside.
- In separate bowls, melt 1 cup of the Enjoy Life Dark Chocolate and 2 cups of the white chocolate. Microwave in 30 second intervals at 50% power, stirring in between each interval, until fully melted. Let cool slightly (it shouldn’t be hot to the touch).
- Once the white chocolate is cool, divide it into quarters. In one of those quarters, add about 1/8 tsp of the green Color Kitchen gel you prepared for the frosting. Very slowly mix it in. White chocolate is very finicky and can seize up easily. Stir gently until smooth.
- In another 1/4 of the white chocolate, add about 1/8 tsp of the orange Color Kitchen gel you prepared for the frosting. Add this in as fast as you want, you want the chocolate to seize up. When it does, take small chunks of the now-moldable orange chocolate and roll into balls. Using a toothpick, form ridges to make it look like a pumpkin. Add a dab of the green white chocolate to the top for a stem. Set aside.
- On a baking sheet covered with parchment paper, spread all the melted dark chocolate in a thin layer (but not so thin that you can see through it). Drizzle 1/4 of the white chocolate over the dark chocolate, and the green-tinted chocolate over that. Use a toothpick to gently marble the surface, running it back and forth in swirling patterns. Quickly add sprinkles and the orange-tinted cane sugar over the entire surface. Place the pan in the fridge or freezer to harden. Once ready to use, cut into large geometric shapes (tall triangles work best) with a very sharp knife. Set aside.
- In the remaining 1/4 of the white chocolate, add about 1/8 tsp of the yellow Color Kitchen gel you prepared for the frosting. Very slowly mix it in, but not all the way (leave it a little marbled). On a small piece of parchment paper, trace the bottom of one of the 6″ cake pans. Flip the parchment over so the ink won’t touch the chocolate. Spread the yellow-tinted chocolate into a 6-inch circle. As it cools, continue to spread it with the back of a spoon to get a swirl effect. Place in the fridge or freezer to harden.
Cake Assembly
- Place the White Buttercream in a large piping bag and the Black Buttercream in a separate piping bag. Cut off about 1/2″ of the tip. No need for a special tip on the bag.
- Place a layer of chocolate cake on your cake stand. Pipe some white buttercream on top and smooth it out, overlapping the edge slightly. Place a pumpkin cake layer on top of the frosted chocolate layer. Pipe some white buttercream on top and smooth it out, overlapping the edge slightly. Repeat with the remaining 3 cake layers, alternating between chocolate and pumpkin.
- Spread a thin layer of white buttercream over the sides and top of the cake (the crumb coat). At this point it will look like a naked cake. Set in the fridge to allow the crumb coat to firm up, about 15 minutes.
- Once the crumb coat is set, pipe alternating rows of white and black buttercream around the cake until you reach the top. Using a bench scraper pressed against the frosting at a 45° angle, smooth the frosting all the way around the cake. Coat the top with white frosting, using an offset spatula to smooth it out.
- *NOTE* If your frosting is too thick, the bench scraper method may not work well. To get the uneven stripes shown in these pictures, I placed a Viva paper towel on the frosting and gently smoothed it with my hands. This flattened the sides but kept the integrity of the uneven stripes.
- Place the frosted cake back in the fridge to allow the frosting to cool and firm up (about 20 minutes) in preparation for the ganache.
Purple Slime (White Chocolate Ganache)
- Add the white chocolate chips and cream in a heat-safe mixing bowl. Microwave at 50% for 1 minute. Stir. Continue heating at 50% power in 30 second intervals until fully melted. Stir in equal parts red and blue Color Kitchen gel colors until you achieve the right purple color. Let cool slightly so it’s not so thin when you pour it on the cake.
Cake Decoration
- Place different closed star tips on the orange, green, and purple frosting bags you prepared the day before. Set aside.
- Remove the frosted cake from the fridge and pour some of the purple ganache on top of the cake. With a spoon, gently push it over the edges to form the drips down the sides. Add more to the top as needed to get all the drips and to evenly coat the top.
- Remove the yellow moon from the parchment and place it the middle of the cake, slightly off-center to the right. Both behind and to the side of it, add the marbled bark in random places. Around the contact points (where the bark/moon are placed in the cake), pipe random stars/flowers/swirls of orange, green, and purple frosting.
- Pipe random stars, flowers, and swirls around the bottom and slightly up the sides of the cake. Set the white chocolate pumpkins around and add a few more sprinkles as well.
- You are finally done! To serve, cut the cake into 8 slices and then cut each slice in half (so someone gets a top piece and someone gets a bottom piece). This is the easiest way to serve it since the slices are so tall and tall/narrow wedges can topple easily.
Notes
- To get flat-topped cakes without trimming, I like to use cake pan strips. If you don’t have these, cut an old towel into strips that will fit around your pans, soak them in ice cold water, wring out the excess, and pin around the outside of the pan with metal binder clips just before placing the pans in the oven.
- Alternately, when the cakes come out of the oven, place a round of parchment over the top while the cake is still hot and gently press down the top to flatten it. Cover the parchment with a dish towel to burning yourself, if necessary.
- The decoration notes are more of a guide than a steop-by-step. Make this cake your own with what you have available.
- Prep Time: 25
- Cook Time: 20
- Category: Mini Naked Cakes
- Cuisine: American
Nutrition
- Calories: 324
Seasonal Flavors and Aesthetic Appeal
The Halloween naked cake is all about celebrating autumn’s flavors while keeping the presentation on point. This cake thrives on rich fall ingredients like:
- Pumpkin spice
- Cinnamon apple
- Chocolate and orange zest
- Red velvet with raspberry “blood” filling
These seasonal pairings make the cake feel like a true fall treat while allowing you to lean into the spooky theme without losing flavor.
And with its naked finish, each slice beautifully reveals your vibrant colors, layers, and delicious fillings. The aesthetic value is unbeatable. A pop of orange frosting, dark cocoa sponge, and Halloween toppings turns every piece into a photo-worthy moment.
Looking for inspiration? Try our take on the fall naked cake, which can easily be adapted into a spooky Halloween naked cake version with just a few creative tweaks.
Customization Options for All Ages
A major win with Halloween naked cake is how customizable they are. The structure stays the same: sponge, filling, minimal frosting. But the flavors, colors, and toppings? That’s where the fun begins.
For kids, try:
- Vanilla sponge with orange frosting and candy eyeballs
- Chocolate cake with crushed Oreos and mini marshmallow ghosts
For adults:
- Pumpkin cake with bourbon caramel drizzle
- Dark chocolate cake with blackberry compote and edible gold flakes
For those with dietary restrictions, you can easily switch out ingredients for vegan, dairy-free, or gluten-free alternatives we’ll cover this in Part 7.
The best part? You can get creative without being a pro decorator. A Halloween naked cake is beautiful because of its imperfections.
Ingredients and Tools You’ll Need
Base Cake Ingredients (Chocolate, Vanilla, Pumpkin Spice Options)
Your Halloween naked cake foundation is, of course, the cake itself. You can go classic or get a little wicked with your flavor choices. Here are three tried-and-true base recipes for different flavor profiles:
| Flavor | Key Ingredients | Best For |
|---|---|---|
| Chocolate Cake | All-purpose flour, cocoa powder, buttermilk, eggs, baking soda, espresso powder | Rich, dramatic cakes with ganache or black frosting |
| Pumpkin Spice Cake | Pumpkin purée, cinnamon, nutmeg, brown sugar, all-purpose flour, oil | Classic autumn flavor with orange and cream accents |
| Vanilla Cake | Cake flour, eggs, whole milk, vanilla extract, butter, baking powder | Kid-friendly cakes with colorful frosting layers |
Each of these flavors complements Halloween themes whether it’s spooky, sweet, or elegantly eerie. Aim for three even cake layers to create that classic naked look.
Want to skip the guesswork? Don’t miss our basic naked cake recipe guide it’s perfect to adapt for Halloween.
Halloween naked cake Decorations: Candies, Fondant, Cookies
Once your base is baked and cooled, it’s time for the spooky stuff. Here’s a list of decorations that will make your Halloween naked cake pop:
- Candy Eyes – Great for monster-themed cakes or peeking out between layers
- Oreo Spiders – Mini Oreos with pretzel legs make a cute, creepy topping
- Fondant Ghosts & Pumpkins – Adds a playful or elegant 3D element
- Drizzled Ganache or Raspberry Sauce – Creates a “bloody” or melty look
- Black Buttercream or Purple Frosting – Add color between layers for drama
- Edible Glitter or Gold Leaf – Perfect for gothic or enchanted themes
Use color sparingly with Halloween naked cake contrast is key. Black against orange, red against white, or chocolate against bright purple stands out beautifully.
Baking Tools and Supplies for Perfect Layers
To pull off a professional-looking Halloween naked cake, having the right tools can save time and hassle. Here’s what you’ll want on hand:
- 3 Round Cake Pans (6″ or 8″) – For consistent, stackable layers
- Offset Spatula – To evenly spread frosting between layers
- Bench Scraper or Cake Smoother – To lightly scrape the sides for the classic naked effect
- Cake Turntable – Makes stacking and decorating way easier
- Piping Bags & Tips – For spiderwebs, dots, or hidden frosting details
- Food Coloring Gel – Better than liquid dye for rich Halloween tones
Optional but awesome:
- Drip Bottle – For adding controlled ganache drips
- Edible Marker Pens – Write spooky messages on fondant or frosting
- Silicone Molds – Make custom chocolate skulls, bones, or tombstones
Check out our main page at nakedcake.net for more cake design tools and ideas.
With your ingredients and tools prepped, you’re ready to move on to the fun part building your Halloween naked cake masterpiece.
Step-by-Step Halloween Naked Cake Recipe
Preparing the Cake Layers
To start off strong, you’ll need a solid, moist cake base. Below is a simple chocolate Halloween naked cake recipe rich in flavor, easy to stack, and visually dramatic.
Chocolate Cake Base Recipe (3 layers, 8-inch pans):
| Ingredient | Quantity |
|---|---|
| All-purpose flour | 1 ¾ cups |
| Cocoa powder (unsweetened) | ¾ cup |
| Baking soda | 1 ½ tsp |
| Baking powder | 1 ½ tsp |
| Salt | ½ tsp |
| Buttermilk (room temp) | 1 cup |
| Sugar | 1 ¾ cups |
| Eggs (room temp) | 2 large |
| Espresso powder (optional) | 1 tsp |
| Vegetable oil | ½ cup |
| Vanilla extract | 2 tsp |
| Boiling water | 1 cup |
Instructions:
- Preheat oven to 350°F (175°C). Grease and line three 8-inch round pans.
- Sift dry ingredients into a large bowl: flour, cocoa, baking soda/powder, salt, espresso.
- In a separate bowl, mix buttermilk, eggs, sugar, oil, and vanilla until smooth.
- Slowly combine wet and dry mixtures.
- Stir in boiling water (batter will be thin this creates moist cake).
- Pour evenly into pans and bake for 30–35 minutes or until a toothpick comes out clean.
- Let cakes cool fully before removing from pans and trimming tops for even layering.
Whipping Up the Spooky Frosting
Now, on to the filling where the spooky fun begins.
Halloween naked cake Buttercream Frosting (Colorful or Neutral):
| Ingredient | Quantity |
|---|---|
| Unsalted butter | 1 cup (2 sticks) |
| Powdered sugar | 3 ½ cups |
| Vanilla extract | 2 tsp |
| Milk or heavy cream | 2–3 tbsp |
| Food coloring (orange, purple, or black) | as needed |
Directions:
- Beat softened butter until fluffy (about 2 mins).
- Gradually add powdered sugar.
- Add vanilla, milk, and beat until smooth.
- Separate into bowls and tint with gel food coloring.
For a dramatic effect, use black or dark purple between layers and orange for top accents. Don’t miss our rich fall cake variations here they’re easy to dress up for Halloween.
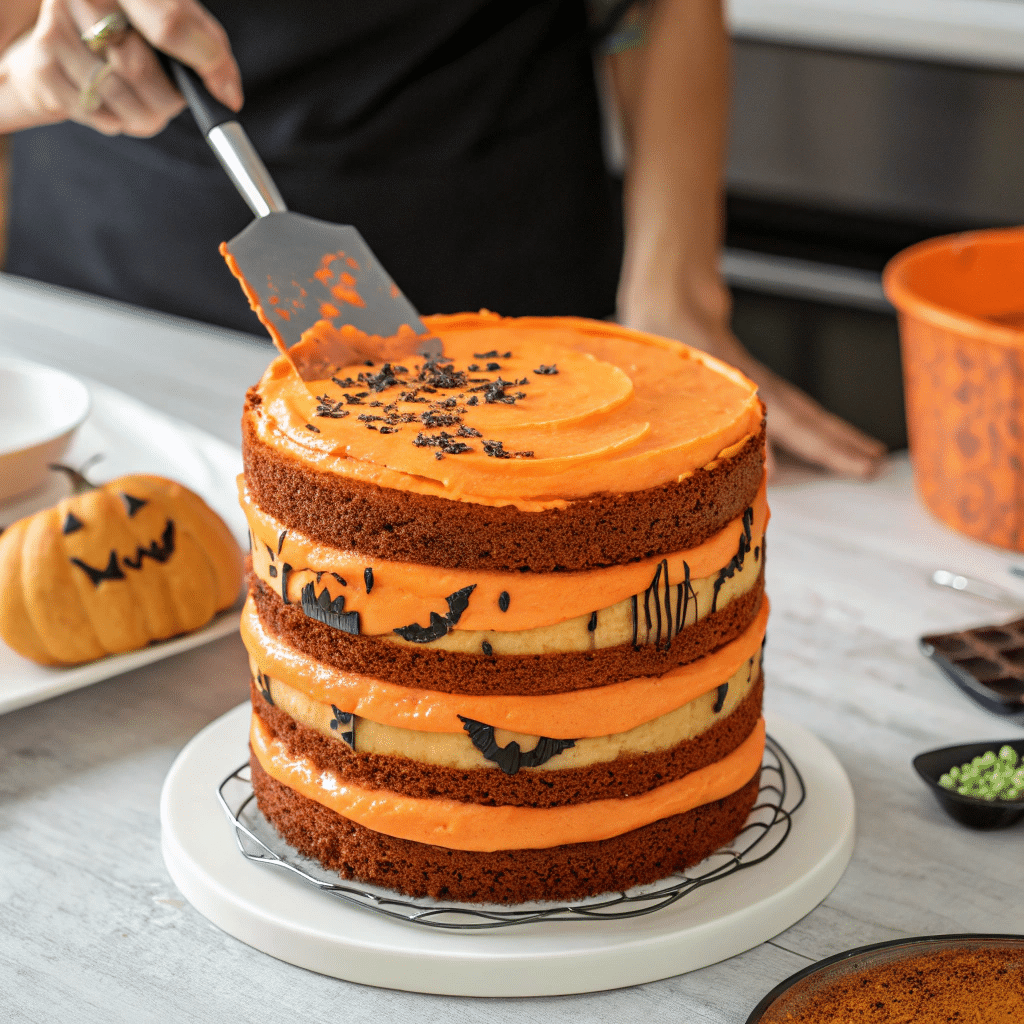
Assembling Without Over-frosting: The Naked Look Explained
Assembling a Halloween naked cake is less about perfection and more about personality. Here’s how to do it right:
- Layer 1: Place the first cake layer on your cake board or stand. Add a generous dollop of frosting in the center and spread outward. Optional: pipe around the edge for cleaner lines.
- Layer 2 & 3: Repeat with middle and top layers.
- Minimal Outer Coat: Use an offset spatula to lightly spread leftover frosting around the outside. Then, use a scraper to remove most of it you just want a trace of frosting to give it that “barely frosted” look.
- Chill It: Let the cake sit in the fridge for 20 minutes to firm up before decorating.
Want a visual aid? Discover our naked cake how-to here for layering hacks and smoother finishes.
This step is where you set the tone whether creepy, cute, or classy, your Halloween naked cake will soon come alive with decorations.
Decorating Ideas for Maximum Halloween Impact
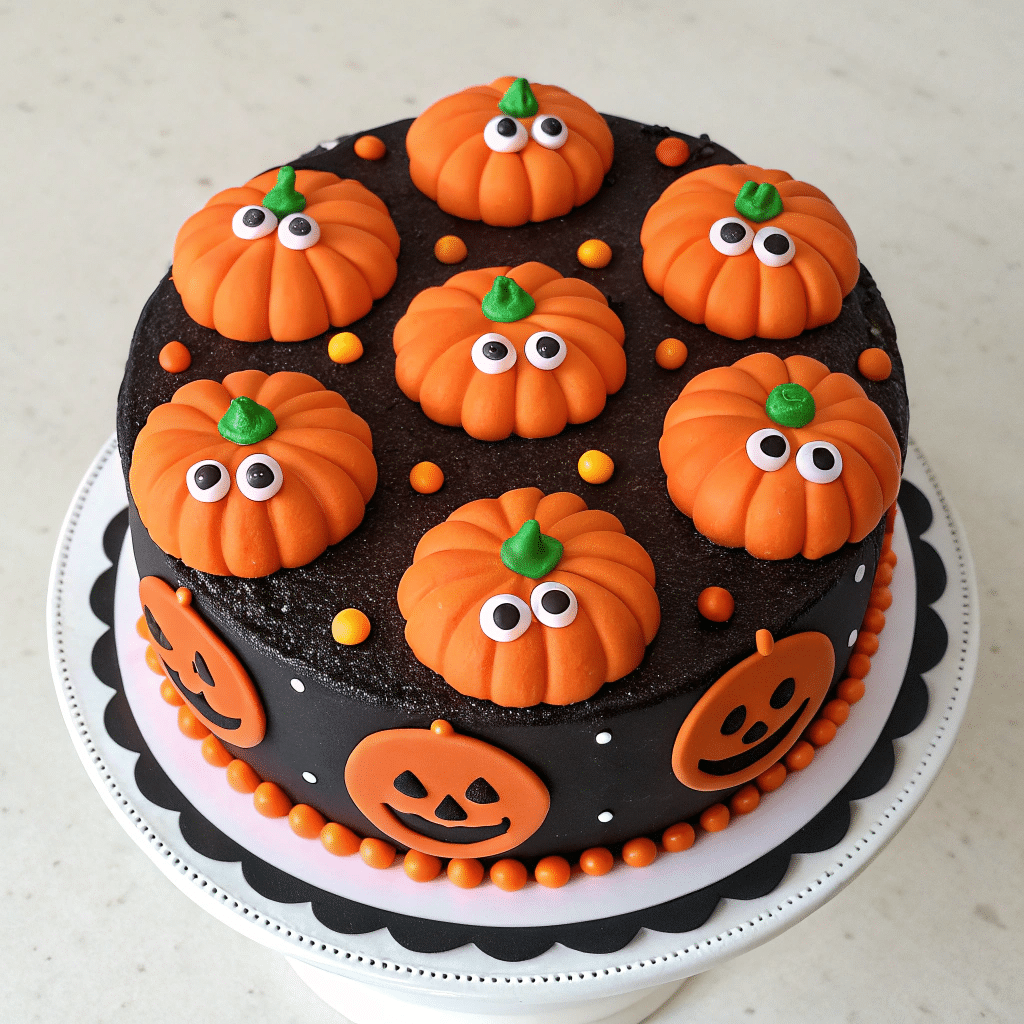
Using Edible Spiders, Eyeballs, and Pumpkins
Now that your cake is stacked and chilled, it’s time to bring it to life or, in this case, the undead. The best part of a Halloween naked cake is how the decorations become the centerpiece. Since the sides of the cake are mostly bare, all eyes are on the top and in between layers.
Here are some easy, creepy add-ons that turn your cake from simple to spellbinding:
- Edible Eyeballs: Made from fondant or white chocolate truffles with food coloring. Nestle them between frosting swirls or in ganache drips for a spooky stare.
- Mini Pumpkins: Use candy pumpkins or mold your own from orange fondant. They pop against dark chocolate or purple backgrounds.
- Oreo Spiders: Half Oreos with pretzel legs and candy eyes make excellent, kid-friendly toppers.
- Candy Bones & Skulls: Use silicone molds and white chocolate to make bony bits to scatter on the cake.
- Witch Hats & Broomsticks: Fondant, licorice, or chocolate-dipped cones work perfectly for a witch-themed look.
You don’t need to over-decorate with a naked cake, less is more. One strong focal element like a black drip and a cluster of toppings can be more effective than covering every surface.
Choosing Between Gory, Cute, and Elegant Styles
Not every naked cake has to be creepy. One of the best things about this cake style is that you can match the decor to your party’s vibe. Here are three easy-to-execute style themes:
| Style | Key Colors | Decorations |
|---|---|---|
| Gory | Red, black, white | Raspberry “blood” drips, candy knives, cracked fondant |
| Cute | Orange, purple, white | Ghost faces, candy pumpkins, friendly spiders |
| Elegant Gothic | Black, burgundy, gold | Edible glitter, dark berries, gold leaf, roses |
Want to create a classy centerpiece for an adult Halloween dinner party? Go for deep red velvet cake with black ganache and edible gold. Throwing a kids’ party? Use neon frosting and cartoonish toppers.
Learn more about gothic naked cake inspiration from our post on naked cakes with flexible designs that transition across seasons.
Color Palettes: Black, Orange, Purple, and Metallics
Color is a game-changer in making your Halloween cake pop without overwhelming it. Use bold frosting between layers to create visible contrast when sliced. Here’s how to think about your palette:
- Black + Orange: Classic Halloween combo; dramatic and fun
- Purple + Green: Great for witches or slime themes
- Black + Gold: Sophisticated and dramatic for adult events
- Red + White: For gory, vampire-style cakes
Pro tip: Gel-based food coloring gives you deep, rich colors without thinning the frosting.
Use colored buttercream to pipe small details like stitches, webs, or monster faces. Or keep it simple let your naked layers show off and just top it with a single chocolate spider.
Don’t miss our eerie styling ideas from the fall naked cake collection they’re easily convertible for Halloween themes.
for Making It Ahead of Time and Keeping It Fresh
Storage Tips for Naked Cakes
When prepping for Halloween festivities, you’ve got enough to worry about your cake shouldn’t be one of them. The good news? A Halloween naked cake can be made ahead of time without sacrificing flavor or texture.
Because naked cakes have minimal outer frosting, they can dry out quicker than fully frosted cakes. Here’s how to keep them fresh:
- Bake the cake layers in advance up to 3 days before your event. Wrap each layer tightly in plastic wrap and store them in the fridge or freezer.
- Assemble the cake the day before for optimal freshness. This allows time for the flavors to meld without drying out.
- Use a cake dome or box to shield the cake from air and fridge odors once it’s assembled. If you don’t have one, gently cover the cake with plastic wrap or a large inverted bowl.
For longer storage:
- Refrigerator: Up to 3 days, fully assembled.
- Freezer: Up to 2 months (store unfrosted layers only for best results).
If using fillings like fruit or cream cheese frosting, keep the cake chilled and avoid warm areas during your Halloween event.
Freezing vs Refrigerating: What Works Best
Need to plan weeks ahead? No problem Halloween naked cake layers are freezer-friendly. Here’s how to do it right:
| Task | Method | Tip |
|---|---|---|
| Freeze Cake Layers | Wrap in plastic + foil | Cool completely first to prevent condensation |
| Thawing | Thaw overnight in the fridge | Avoid room temp to prevent sogginess |
| Chill Before Decorating | Refrigerate for 30–60 mins | Makes layering and frosting cleaner |
Avoid freezing the fully decorated cake unless absolutely necessary. Frosting and decorations can lose their texture and shape when thawed.
Looking for inspiration? Try our basic naked cake tutorial which walks you through baking and storing cake layers the smart way.
Best Practices for Reapplying Frosting or Decorations
Sometimes frosting melts or decorations shift especially with fondant or buttercream exposed to heat. Here’s how to fix that fast:
- Buttercream touch-up: Beat a small batch and apply with a spatula for cracks or dryness.
- Reapply ganache drips: Heat gently and use a spoon or drip bottle.
- Reinforce fondant decorations: Use a dab of frosting or edible glue to reattach toppers.
- Freshen the look: Add last-minute garnishes like edible glitter, fresh fruit, or candy on the day of serving.
These little tweaks make your Halloween naked cake look bakery-fresh without redoing the whole thing.
Halloween Naked Cake for Different Diets
Vegan and Gluten-Free Halloween Naked Cake Options
No one should miss out on dessert just because of dietary restrictions. With the right swaps, your Halloween naked cake can be just as delicious and festive without dairy, eggs, or gluten.
Here’s how to adapt your cake for different dietary needs:
Vegan Cake Base:
Swap out traditional dairy and eggs for plant-based alternatives. Here’s a foolproof vegan chocolate cake base:
| Ingredient | Substitute |
|---|---|
| Eggs | 1 tbsp ground flaxseed + 3 tbsp water (per egg) |
| Milk | Unsweetened almond, soy, or oat milk |
| Butter | Vegan butter (like Earth Balance) or coconut oil |
| Buttermilk | Plant milk + 1 tbsp vinegar or lemon juice |
| Chocolate | Check for dairy-free labels (dark chocolate usually works) |
Gluten-Free Option:
For gluten-sensitive guests, replace all-purpose flour with a 1-to-1 gluten-free flour blend (like Bob’s Red Mill or King Arthur).
Baking Tips:
- Always grease pans well and line with parchment vegan or gluten-free cakes can stick more easily.
- Let the cake cool completely before stacking to avoid crumbling.
- Gluten-free cakes are often more fragile, so be gentle when layering.
Low-Sugar and Allergy-Friendly Versions
If you’re baking for kids or anyone with allergies, here’s how to keep things sweet and safe without overdoing the sugar or triggering reactions:
Low-Sugar Ideas:
- Use unsweetened applesauce to replace half the sugar in your cake recipe.
- Go for dark chocolate with high cocoa content (less sugar, more flavor).
- Try monk fruit sweetener or coconut sugar for a lower glycemic index.
Nut-Free Alternatives:
- Avoid almond or nut-based flours use oat, rice, or traditional wheat instead (if gluten is okay).
- Check food colorings and candy decorations some contain nut traces.
- Use sunflower seed butter instead of nut butters in fillings or frostings.
Dairy-Free Frosting:
Whip up a coconut cream frosting using full-fat canned coconut milk and powdered sugar. It’s rich, fluffy, and holds its shape beautifully perfect for spooky swirls or piping webs.
Here’s a simple recipe:
Dairy-Free Chocolate Ganache Drip:
| Ingredient | Quantity |
|---|---|
| Dairy-free chocolate chips | 1 cup |
| Full-fat coconut milk | ½ cup |
- Heat the coconut milk until steaming (not boiling).
- Pour over chocolate chips and let sit 2 mins.
- Stir until smooth, then drizzle over chilled cake.
With a few thoughtful swaps, your Halloween naked cake can delight every guest at your party no matter their diet.
Don’t miss our full post on naked cake variations for more ideas that are easy to adapt across dietary needs.
Serving and Presenting Your Halloween Naked Cake
Creative Cake Stand & Table Setup Ideas
You’ve baked, layered, and decorated your Halloween naked cake now it’s time to show it off. The way you present the cake can elevate the entire vibe of your Halloween event.
Here are some spooky and stylish display ideas to make your dessert table unforgettable:
| Display Element | What to Use | Why It Works |
|---|---|---|
| Dark Cake Stand | Matte black, wood, or glass | Adds height and gothic flair |
| Spider Web Tablecloth | Lace or plastic overlay | Sets a haunted scene beneath the cake |
| LED Fairy Lights | Orange or purple lights under the stand | Gives the cake a glowing, eerie vibe |
| Mini Pumpkins & Candles | Real or faux | Frame your cake with natural Halloween textures |
| Smoke Effect | Dry ice or fog machine (safely placed) | Adds drama and makes the cake feel magical |
You don’t need a huge party setup even a small home gathering feels more festive with just a few styling details.
Looking for inspiration? Try ideas from our featured fall cake styling tips to elevate any naked cake into centerpiece territory.
How to Slice and Serve Without Ruining the Design
Naked cakes look great whole, but slicing them can feel intimidating especially when decorations are delicate or layered.
Follow these tips to serve your cake with style and structure:
- Chill Before Slicing: Refrigerate your cake 30 minutes before serving. It firms up the frosting and fillings, reducing mess.
- Use a Hot Knife: Dip a sharp knife in hot water, wipe it dry, then slice it glides through layers like butter.
- Slice Vertically: For tall cakes, cut 1-inch-wide vertical slices and lay them flat on plates to show off the filling.
- Serve With Colorful Plates or Napkins: Make those dramatic cake layers pop with Halloween-themed serveware.
If your decorations include toppers or fondant shapes, gently remove and place them alongside the plated cake to keep the theme intact.
Bonus tip: Use mini cake flags or toothpick toppers labeled “witch’s slice,” “monster bite,” or “ghost piece” for added fun and social media-ready visuals.
Pairing with Themed Drinks or Snacks
Take your Halloween naked cake to the next level by pairing it with drinks and sides that amplify the experience:
- Witch’s Brew Punch: Grape soda, ginger ale, and sherbet
- Pumpkin Spice Lattes or Hot Apple Cider: Cozy drinks that echo fall flavors
- Chocolate-dipped Pretzels: Match your cake’s chocolate tones
- Caramel Popcorn or Candy Bark: Crunchy, sweet sides to balance the cake’s texture
Want your cake to be the main event? Display a sign like “Death by Cake” or “Slice of the Afterlife” next to it because even spooky desserts deserve dramatic flair.
Popular Halloween Naked Cake Variations to Try
Pumpkin Spice with Cinnamon Buttercream
Few things scream fall like a pumpkin spice cake, and it’s a natural base for a Halloween naked cake. The earthy pumpkin flavor pairs perfectly with warm spices and creates a moist, dense crumb ideal for layering.
How to Make It Special:
- Add a dash of nutmeg, clove, and allspice to your batter.
- Tint your cinnamon buttercream a pale orange or beige for that rustic Halloween look.
- Top it with mini candy pumpkins, cinnamon sticks, or a drizzle of maple glaze.
This one’s a crowd-pleaser, especially for daytime Halloween events or adult-friendly harvest parties.
Learn more about how we transform fall cakes into seasonal showstoppers in our fall naked cake feature.
Chocolate Orange with Ganache Drizzle
Chocolate and orange is an unexpected Halloween pairing that’s rich, zesty, and incredibly elegant. It’s perfect for a gothic or witchy theme.
Flavor Profile:
- Use dark chocolate sponge layers infused with orange zest or extract.
- Spread orange-tinted buttercream or orange marmalade between layers.
- Drizzle dark chocolate ganache over the top and sides for a moody finish.
Decor Tips:
Add orange peel twists, chocolate truffles, or edible glitter for a high-end finish.
Red Velvet with “Bloody” Raspberry Sauce
This variation turns up the spooky factor while still being delicious. Red velvet’s naturally vibrant hue is ideal for Halloween, and the tang of cream cheese pairs well with the tartness of raspberry sauce.
Here’s how to nail it:
- Bake three layers of deep red velvet cake.
- Fill with cream cheese frosting (or a butter-based version if you’re going dairy-free).
- Drip raspberry or strawberry puree down the sides to look like blood.
- Finish with white chocolate bones or candy knives on top.
Why it Works:
The color contrast between the white frosting, red cake, and dark “blood” drip makes this cake truly show-stopping on any Halloween dessert table.
Conclusion:
A Halloween naked cake is more than just dessert it’s an edible centerpiece that tells a spooky story through every slice. With its visible layers, minimal frosting, and endless decorating options, it’s easy to tailor for any age group or party vibe. From rich chocolate ganache to pumpkin spice warmth, this cake lets you celebrate the season with flavor and flair.
FAQs:
What is a Halloween naked cake?
It’s a layered cake with minimal or no outer frosting, decorated with spooky Halloween themes like candy eyeballs, edible ghosts, and chocolate drips.
How do you decorate a naked cake for Halloween?
Use themed toppings like Oreo spiders, fondant pumpkins, ganache drips, or raspberry “blood.” Colorful buttercream between layers adds visual contrast.
What flavors work best for a Halloween-themed naked cake?
Popular choices include chocolate, pumpkin spice, red velvet, and even orange-infused cakes. Each pairs well with spooky colors and fall spices.
Can I make a Halloween naked cake ahead of time?
Yes! Bake the layers 2–3 days in advance and store them wrapped. Assemble the day before your event, and refrigerate the finished cake until serving.
What’s the difference between a naked cake and a semi-naked cake?
A naked cake has little to no outer frosting, showing off its layers. A semi-naked cake has a light scraped coating around the outside.
What are the best spooky toppings for Halloween cakes?
Candy eyeballs, chocolate skulls, Oreo spiders, black ganache drips, and fondant ghosts are fun and thematic.